
NOTE: THIS IS A WORK IN PROGRESS
So you have heard of debian. Heard that it was the parent to ubuntu and Ultimate Edition. And wanted to see where the os you have come to love got its roots from Or maybe you have heard it was lighter (this is only true to a point). Maybe you wanted to start with a "clean slate". Maybe you just wanna try a little something else. But your thought to yourself what the hell is debian exactly? How do i get it? How do i install it? How do i use it? Well that is the whole purpose of this howto. i will lead along as i do a minimal install (initially) and build up from there to a very useable desktop.
Before we get started ill first give a little background on debian.
WHAT is Debian?
The Debian Project is an association of individuals who have made common cause to create a free operating system. This operating system that we have created is called Debian GNU/Linux, or simply Debian for short. An operating system is the set of basic programs and utilities that make your computer run. At the core of an operating system is the kernel. The kernel is the most fundamental program on the computer and does all the basic housekeeping and lets you start other programs. Debian systems currently use the Linux kernel. Linux is a piece of software started by Linus Torvalds and supported by thousands of programmers worldwide. However, work is in progress to provide Debian for other kernels, primarily for the Hurd. The Hurd is a collection of servers that run on top of a microkernel (such as Mach) to implement different features. The Hurd is free software produced by the GNU project. A large part of the basic tools that fill out the operating system come from the GNU project; hence the names: GNU/Linux and GNU/Hurd. These tools are also free. Of course, the thing that people want is application software: programs to help them get what they want to do done, from editing documents to running a business to playing games to writing more software. Debian comes with over 25113 packages (precompiled software that is bundled up in a nice format for easy installation on your machine) — all of it free. It's a bit like a tower. At the base is the kernel. On top of that are all the basic tools. Next is all the software that you run on the computer. At the top of the tower is Debian — carefully organizing and fitting everything so it all works together.
How'd it all get started?
Debian was begun in August 1993 by Ian Murdock, as a new distribution which would be made openly, in the spirit of Linux and GNU. Debian was meant to be carefully and conscientiously put together, and to be maintained and supported with similar care. It started as a small, tightly-knit group of Free Software hackers, and gradually grew to become a large, well-organized community of developers and users.
Source:About Debian
Does it support my computer architecture?
I can almost gaurentee you that it will.
The following architectures are supported by the "stable" branch
* Alpha
* AMD64
* ARM
* EABI ARM
* HP PA-RISC
* Intel x86
* Intel IA-64
* MIPS (big endian)
* MIPS (little endian)
* PowerPC
* IBM S/390
* SPARC
Source:Stable Release Info
What are my choices?
Stable:
The "stable" distribution contains the latest officially released distribution of Debian. This is the production release of Debian, the one which we primarily recommend using. The current "stable" distribution of Debian GNU/Linux is version 5.0.0, codenamed lenny. It was released on February 14th, 2009.
Testing:
The "testing" distribution contains packages that haven't been accepted into a "stable" release yet, but they are in the queue for that. The main advantage of using this distribution is that it has more recent versions of software. See the Debian FAQ for more information on what is "testing" and how it becomes "stable". The current "testing" distribution is squeeze. This release started as a copy of lenny (the current stable), and is currently in a state called "testing". That means that things should not break as badly as in unstable or experimental distributions, because packages are allowed to enter this distribution only after a certain period of time has passed, and when they don't have any release-critical bugs filed against them.
Unstable:
The "unstable" distribution is where active development of Debian occurs. Generally, this distribution is run by developers and those who like to live on the edge. The "unstable" distribution is called sid. This distribution will never get released; instead, packages from it will propagate into testing and then into a real release. "sid" is subject to massive changes and in-place library updates. This can result in a very "unstable" system which contains packages that cannot be installed due to missing libraries, dependencies that cannot be fulfilled etc. Use it at your own risk!
Source:Releases Testing Info Unstable Info
NOTE: I STRONGLY ADVISE AGAINST USING SID (UNSTABLE)
I personally use "testing" because it has newer packages and gets updated more often than stable. Some people rather use Lenny (stable).
So what are my install media options?
Netinstall:
These small "netinst" images can be downloaded quickly. These allow you to download only those Debian packages that you actually want, but require an Internet connection on the machine being installed. If you have a permanent connection to the Internet, you can install Debian using that. You would initially download only a small portion of Debian required to start the installation process, and then install whatever else you want from within the installation program. This sort of network installation process requires Internet access via Ethernet or wireless (possibly using a PCMCIA card in your laptop). Unfortunately, it does not support internal ISDN cards. Instead of getting a full 650MB CD image, you just download a CD image file which contains the bare essentials necessary to install the rest. It is necessary to have access to a CD recorder in order to use this. The image files are up to 180 MB in size
CD/DVD SETS:
In total there are 31CD's or 5 DVD's. No you don't need them all. All you would need if you went this route would be the first cd or dvd. The rest just contain the rest of debians repo. The only time it would make sense to download them all is if you have no internet connection on the machine you will be installing to.
I always use the netinstall cd personally. Its a very small download. Contains everything i need to start with anyway (i never install xorg or gnome during initial install).
GOTTA RUN FOR NOW. ILL CONTINUE ADDING TO THIS GUIDE OV ER THE NEXT FEW DAYS SO STAY TUNED
Are you a spammer
Please note, that the first 3 posts you make, will need to be approved by a forum Administrator or Moderator before they are publicly viewable.
Each application to join this forum is checked at the Stop Forum Spam website. If the email or IP address appears there when checked, you will not be allowed to join this forum.
If you get past this check and post spam on this forum, your posts will be immediately deleted and your account inactivated.You will then be banned and your IP will be submitted to your ISP, notifying them of your spamming. So your spam links will only be seen for an hour or two at most. In other words, don't waste your time and ours.
This forum is for the use and enjoyment of the members and visitors looking to learn about and share information regarding the topics listed. It is not a free-for-all advertising venue. Your time would be better spent pursuing legitimate avenues of promoting your websites.
Debian minimal-->usable desktop install guide(UNFINISHED)
12 posts
• Page 1 of 2 • 1, 2
Debian minimal-->usable desktop install guide(UNFINISHED)
![]() by drama » Tue Mar 31, 2009 4:51 pm
by drama » Tue Mar 31, 2009 4:51 pm
ULTIMATE EDITION 2.5 X64/ARCHLINUX X64 DUAL BOOT
Antec 900two case
3 antec 120mm tri cool blue led fans (1 rear exaust 2 front intake)
1 antec 220mm "bigboy" tri cool blue led fan (top exaust)
Amd Phenom II X4 955 Black Edition Am3 Cpu OC'D @ 4.2 Rev C3
MSI NF980-G65 Am3 Socket DDR3 Tri-sli ATX Mainboard
Nvidia 980A Sli Chipset
Corsair 2GB Dual Channel ram (1GBx2) DDR3 @ 1600 MHZ
EVGA Nvidia GTS-250 1GB PCI Express Graphics Card
Lite-On Dual Layer Sata Dvd Burner
3x 1TB Seagate Sata Hdd's 32Mb cache
ASUS VH235 23 Inch Lcd Wide Screen Monitor
OCZ ModXStream Pro 700Watt Psu
Rosewill 3.5" Internal USB 2.0 Card Reader w/ Floppy Drive
-

drama - U.E. Master

- Posts: 580
- Joined: Wed Oct 17, 2007 11:26 am
- Location: eastern iowa, united states
- Age: 42
- Operating System: Ultimate Edition 3.2 32 BIT
Debian minimal-->usable desktop install guide(UNFINISHED)
![]() by drama » Wed Apr 01, 2009 6:49 am
by drama » Wed Apr 01, 2009 6:49 am
Ok now the first thing we need is to download our installation media (iso format).
Remember earlier I said we have 3 choices
CD (full set of 31 available but only need the first one)
DVD (full set of 5 available but only need the first one)
NETINSTALL CD (150mb) <---This is all we actually need if we have a network connection on the pc we are installing to. This is what i will use for this howto.
they are located here (will add amd64 later)
I386 (x86/32bit install media)
CD SETS
FULL SET
HTTP (full set listing)
TORRENT (full set listing)
At most you should only need the first cd though you can get just the first one here
Debian lenny (stable) cd1 .iso (HTTP)
Debian lenny (stable) cd1 .iso (TORRENT)
DVD SETS
FULL SET
HTTP (full set listing)
TORRENT (full set listing)
At most you should only need the first DVD though you can get just the first one here
Debian lenny (stable) dvd1 .iso (HTTP)
Debian lenny (stable) dvd1 .iso (TORRENT)
NETINSTALL CD (150MB)
Debian lenny (stable) netinstall (150mb) .iso (HTTP)
Debian lenny (stable) netinstall (150mb) .iso (TORRENT)
NOTE: I HAVE ONLY LISTED THE DISCS FOR THE STABLE VERSION. THE INSTALLER FOR TESTING IS CURRENTLY BROKEN (NETWORK DETECTION AND HARD DRIVE DETECTION FAILS) SO THERE IS NO SENSE IN LISTING THEM.
Note 2: This isnt a problem. Directly after install we can easily upgrade to testing by doing a "dist-updrade" without any problems at all (grabs less than 50mb as off 4/1/09)
I will be using the Netinstall cd as i always do (personal preference). This howto will work the same no matter what installation media you use though (netinstall/standard cd/standard dvd all work the same exact way).
Now to get started. I grab the netinstall cd
It comes in "iso format". After its finished downloading I burn it with my preferred burning app at the LOWEST speed.
Then pop it in the cd/dvd drive and reboot.
Note: Make sure your pc is able to boot from a cd/dvd drive. This setting should be in your bios. It should already be set as such though
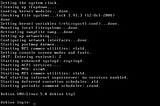
As soon as the cd/dvd boots this is the first think we will see. click the pictures for a bigger version
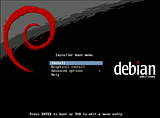
Use your keyboard to highlight install then hit enter.
Note: During the install your mouse WONT work. Only keyboard. the controls are as follows.
Arrow keys: No change. They work as normal
Number keys: Now change. They work as normal
Spacebar: We use this to add or remove "*" (an "*" means the item is "checked")
Enter: Used to select (similar to a mouse click)
Tab: Navigates between certain areas of the screen (forward,back, areas when we must select) Ill give info on this whenever we need to hit tab
After we hit install we are presented with the following screen
Choose language:
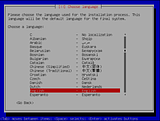
Just use the arrow key to highlight your preferred language and hit enter. As you can see i have chosen "english".
Next we see this.
Choose country:
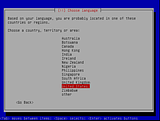
Use the arrow key to highlight your country. Then hit enter I'm from the states so that's what i chose.
Next we see this.
Choose keyboard layout:
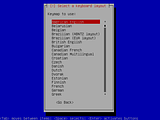
Choose your preferred layout and hit enter. I have chosen "American English" as my preferred.
Next we see this
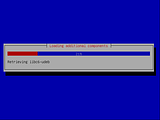
As you can see its loading some required components. No action needed from us.
Next we see this.
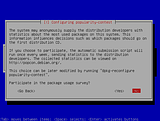
Hostname info:
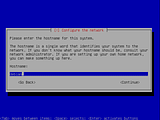
Hit the tab key until the red box is on the "text field". You can leave this as is or enter your required info. Now hit tab until the "continue" button is highlighted and then hit enter.
Next we see this
Domain Name:
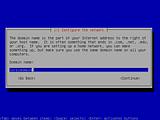
Hit the tab key until the red box is on the "text field". You can leave this as is or enter your required info. Just remember that if you have a home network setup this needs to be the same as the rest of the computers on your network. Now hit tab until the "continue" button is highlighted and then hit enter.
Next we see this
Configure clock/timezone:

Use the arrow keys to highlight your timezone and hit enter. I am in central timezone so that is what i chose.
Next we see this
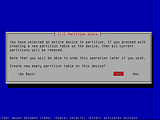
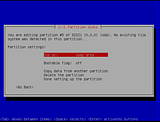
Partition hard drives:
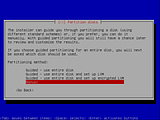
Use the arrow keys to highlight your preferred method and hit enter. I prefer to do mine manually so that is what i chose. If your not too farmilar with this though and your sure you want to use the WHOLE disk you can choose guided.
Note: using guided will wipe the WHOLE disk. Including any operating system or files currently on there
Next we see this
Current partition/disk layout:
Note: Yours will look slightly different.
In this example I'm going to totally wipe the current drive. You DONT have to do this though. You can select the individual partitions and delete or resize them to give use the free space needed to set up our new partitions for this install. You will need at least 2 new partitions. One mount at "/" and a swap. Swap isn't mandatory but i do suggest it. Especially if you have a limited amount of ram.
Select your action and hit enter. Since im going to wipe the drive and start fresh i highlight the drive (not the partitions) and hit enter.
Next we see this
I want to start fresh (wipe the disk). So i select yes. And then hit enter.
Next we see this

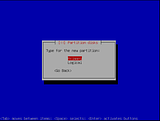
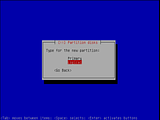
As you can see i have wiped the drive (only took a few seconds). There are now no partitions on it at all. Its all free "unpartitioned" space. Now i need to set up my partitions. So i select the free space entry and hit enter.
next we see this
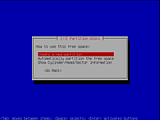
I want to create a new partition. So i select "create new partition" and hit enter.
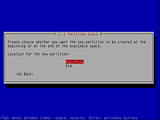
Next we see this
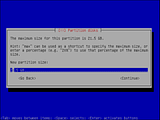
Now i want to save some space for swap. So i dont use the whole "21.5GB". I usually save about 1GB for swap. So i hit tab until the "text" field is highlighted. 21.5 GB total-1Gb for swap=20.5GB. So i enter 20.5GB in the field. Then i hit tab until the "continue" field is highlighted. Then i hit enter.
Next we see this
We want our main partition set up as "primary". So i highlight that then hit enter.
Next we see this
Highlight beginning and then hit enter.
Next we see this

Here we can edit some of the "properties/settings" of the partition. Now im not going to get into all the different types of filesystems and they're pros and cons.
We do want to make sure we see a few things here though (highlight anyfield and hit enter to edit its properties/setting).
Use as: This is your filesystem type. I suggest ext3.
Format: I suggest setting it to "yes".
Mount point: We need at least one filesystem mounted at "/". If not it wont let us install.
Bootable flag: The boot flag MUST be set to ON for the partition mounted at "/". Otherwise the system wont be bootable.
I also highly suggest leaving "reserved blocks" at "5%" and "mount options" at "defaults".
You can enter a label if you want.
Now we highlight "done setting up the partition" and hit enter.
Next we see this
As you can see it shows the partition we just set up. As well as some free space. Now we will set up our swap partition. Highlight the free space entry and hit enter.
Next we see this

This is where we set the size of out swap partition. It CANT be any larger than the amount of space left though. Obviously. As you can see i have "970.6MB" left. I'm going to use all this as my swap. So i hit tab until the "text" field is highlighted. Then i enter 970.6MB. Then hit tab until "continue" is highlighted. Then hit enter.
Next we see this
This time I choose "logical". This is just a personal preference. You can choose "primary" if you want. But i always use logical. Then hit enter.
Next we want to make sure the setup looks like this
Its very simple. Just highlight "use as" and hit enter. Choose "swap". After choosing swap it should look identical to the above picture. I should also note that we DONT need the boot flag to be set to on. So make sur eits set to "off. It should already be like that though. After it looks just like the picture above we then highlight "done setting up the partition". Then hit enter.
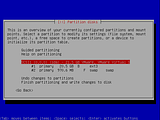
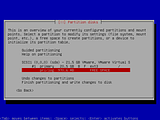
Next we see an overview of all our partitions. As you can see the two partitions i just setup are listed. But we havent wrote the changes to disk yet.
We highlight "finish partitioning and write changes to disk"
Next we see this
Confirmation:
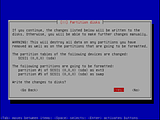
We do want to go ahead and save the partition scheme so we highlight "yes" and hit enter.
Next we see this
Formatting partitions in action:
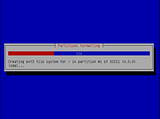
We can see the progress of the formatting/partition creation. This step might take a few minutes so be patient. No action is needed from us.
next we see this
Installing base system:
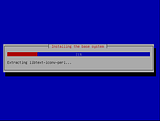
Here we can see the progress of the base system. This is just the most basic/core packages. No action needed by us.
Next we see this
Users and passwords-->root password:
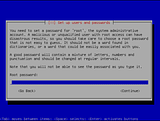
Hit tab until the "text" field is highlighted. Enter a password for the root account. Then hit enter. Make sure its something you can remember but thats hard to guess. Then it will ask you to confirm it. Then hit enter again.
Note: I would like to take this time to explain something. In ubuntu and Ultimate Edition we use "sudo" to preform administrative tasks. This differs in debian. In debian there is no sudo. At least not initially. Instead we use the command "su -" then type the root password to preform these tasks. Then use the command "exit" to drop back to our standard user afterwards. The way to tell if you are temporarily root is by looking at the command prompt. If it says "root@hotstname" then you have root privledges. If it says "yourusername@hostname" then you dont. I feel this is actually more secure to a point though. This way only the person that knows the root password can get administrative privledges. Where as in ubuntu anyone could use "sudo" then type they're own password and bam they would have administrative privledges. However it can also be more dangerous if your not careful. How you ask? Say you use "su -" to gain administrative privledges. Then you walk away without using "exit" first. Examples: Phone rings, baby is crying, somebody is at the door, ect. Then anyone can come along a housemate or whatever and do anything they want. Where with sudo it expires after 5mins (i think it is 5mins anyway). And you no longer can gain administrative privledges without knowing the password to YOUR user account. This being said i actually prefer NOT having sudo. However later in this guide i will show you how to setup sudo (i know some ppl would rather use it).
Now back to where we were.
After we confirm the ROOT password we will see the following
Users and passwords-->user full name
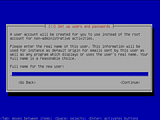
Here you can enter the "FULL NAME" for the first user. I usually just use the same as my username though. Hit tab until the "text" field is highlighted then enter your preference. Then hit enter.
Next we see this
Users and password-->username/login name
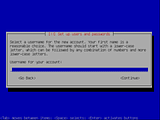
While this may look just like the previous screen. This is where we actually enter our username (used for login). Hit tab until the "text" field is highlighted then enter your preferred username. Then hit enter.
Next we see this
Enter password:
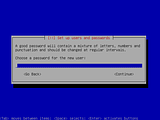
Now we set up the password for our regular user account. Once again make sure its something you can remember but hard to guess. It should also be different from the ROOT password. Hit tab until the "text" field is highlighted. Then enter your password and hit enter. It will then ask you to confirm it. Just enter it again and hit the enter key.
Next we see this
Configure package manager-->mirror country
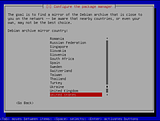
This is for choosing a mirror close to you (for the sources.list). Highlight your country then hit enter. Im from the united states so i chose "united states".
Next we see this
Configure package manager-->archive mirror
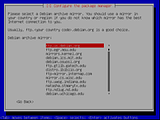
Here we will pick the actual mirror we want to use. Your list will look slightly different. This is the list for the united states. Highlight the mirror you want to use then hit enter. I usually use "debian.org" but you can chose a different one if you like.
Next we see this
Configure package manager-->proxy info
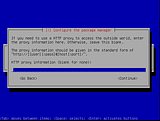
If you know you need to use a proxy enter the correct info here in the following format (http://user:pass@host:port). I dont need a proxy so i dont enter anything here. Hit enter.
Next we see this
Configuring apt
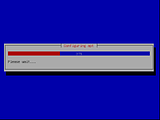
All this shows is the process of apt. Its actually just updating the sources.list and updating the package list. This may take some time depending on your internet connection speed.
At this time i would like to pass along a neat little thing i found. While the installer is text based you cant actually tell what it is doing deep underneath. However if you hit alt+f4 it will switch to vt4 (virtual terminal #4). Here you can see all the little things that the installer is actually doing. As shown in this shot.
This doesnt interrupt the installer at all either. As you can see its aquiring the package lists. This is actually a very good way to tell if the installer has stalled/froze ir if there are any errors and what not. To get back to the installer terminal (vt1) simply hit alt+f1.
Now after its done updating the package lists we will see the following screen
popularity contest
This is totally your choice. But i prefer not to use it. So i select "no". Its your chose though. Highlight your chose and hit enter.
Next we see this
Select software
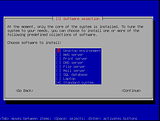
Here we select what we want installed.. Hit tab until the red square is in the middle where the choices are. Highlight each selection and REMOVE the "**" from EVERYTHING EXCEPT STANDARD SYSTEM. Use the spacebar to add or remove the "**". If you have a laptop though make sure there is a "**" next to the "laptop" task. By doing this we will only be installing a command line system. But ill show you later how to build up from there. My theory behind this is that its usually best to install the command line system. Followed by xorg and then your "desktop environment" (gnome/kde/xfce/ect ect). Ive found the system generally runs much smoother. After you have only "standard" selected and "laptop" (if and ONLY if you have a laptop). Hit the tab key until the "continue" field is highlighted. Then hit enter.
Next we see this
Retreiving and installing software we selected:
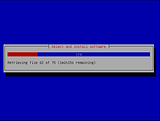
Here you can see the progress of the software install. Now action needed from us.
Next we see this
Install grub:
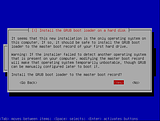
This asks you to confirm that you want grub installed to the "MBR". I always select yes. If you chose no it will then ask you to specify where you want it installed to. Hightlight your choice then hit enter.
Next we see this
Install finished/reboot:

We are now finished with the initial install. Your cd/dvd try should open on its own. Remove the disc from the tray and close it. Lastly hit enter. The system will now reboot.
Next we see this (hopefully as long as everything went well)
We should boot to a login prompt as shown. Remember we didnt install xorg or a desktop environment yet. We will be do in that soon tho. So right now we just have a command line system.
Keep checking back. We will be upgrading to squeeze "testing" next followed by installing xorg and the core of gnome (we wont install the whole thing only what we ACTUALLY need. Hopefully this guide has been very informative so far.
Remember earlier I said we have 3 choices
CD (full set of 31 available but only need the first one)
DVD (full set of 5 available but only need the first one)
NETINSTALL CD (150mb) <---This is all we actually need if we have a network connection on the pc we are installing to. This is what i will use for this howto.
they are located here (will add amd64 later)
I386 (x86/32bit install media)
CD SETS
FULL SET
HTTP (full set listing)
TORRENT (full set listing)
At most you should only need the first cd though you can get just the first one here
Debian lenny (stable) cd1 .iso (HTTP)
Debian lenny (stable) cd1 .iso (TORRENT)
DVD SETS
FULL SET
HTTP (full set listing)
TORRENT (full set listing)
At most you should only need the first DVD though you can get just the first one here
Debian lenny (stable) dvd1 .iso (HTTP)
Debian lenny (stable) dvd1 .iso (TORRENT)
NETINSTALL CD (150MB)
Debian lenny (stable) netinstall (150mb) .iso (HTTP)
Debian lenny (stable) netinstall (150mb) .iso (TORRENT)
NOTE: I HAVE ONLY LISTED THE DISCS FOR THE STABLE VERSION. THE INSTALLER FOR TESTING IS CURRENTLY BROKEN (NETWORK DETECTION AND HARD DRIVE DETECTION FAILS) SO THERE IS NO SENSE IN LISTING THEM.
Note 2: This isnt a problem. Directly after install we can easily upgrade to testing by doing a "dist-updrade" without any problems at all (grabs less than 50mb as off 4/1/09)
I will be using the Netinstall cd as i always do (personal preference). This howto will work the same no matter what installation media you use though (netinstall/standard cd/standard dvd all work the same exact way).
Now to get started. I grab the netinstall cd
It comes in "iso format". After its finished downloading I burn it with my preferred burning app at the LOWEST speed.
Then pop it in the cd/dvd drive and reboot.
Note: Make sure your pc is able to boot from a cd/dvd drive. This setting should be in your bios. It should already be set as such though
As soon as the cd/dvd boots this is the first think we will see. click the pictures for a bigger version

Use your keyboard to highlight install then hit enter.
Note: During the install your mouse WONT work. Only keyboard. the controls are as follows.
Arrow keys: No change. They work as normal
Number keys: Now change. They work as normal
Spacebar: We use this to add or remove "*" (an "*" means the item is "checked")
Enter: Used to select (similar to a mouse click)
Tab: Navigates between certain areas of the screen (forward,back, areas when we must select) Ill give info on this whenever we need to hit tab
After we hit install we are presented with the following screen
Choose language:

Just use the arrow key to highlight your preferred language and hit enter. As you can see i have chosen "english".
Next we see this.
Choose country:

Use the arrow key to highlight your country. Then hit enter I'm from the states so that's what i chose.
Next we see this.
Choose keyboard layout:

Choose your preferred layout and hit enter. I have chosen "American English" as my preferred.
Next we see this

As you can see its loading some required components. No action needed from us.
Next we see this.
Hostname info:
Hit the tab key until the red box is on the "text field". You can leave this as is or enter your required info. Now hit tab until the "continue" button is highlighted and then hit enter.
Next we see this
Domain Name:
Hit the tab key until the red box is on the "text field". You can leave this as is or enter your required info. Just remember that if you have a home network setup this needs to be the same as the rest of the computers on your network. Now hit tab until the "continue" button is highlighted and then hit enter.
Next we see this
Configure clock/timezone:
Use the arrow keys to highlight your timezone and hit enter. I am in central timezone so that is what i chose.
Next we see this
Partition hard drives:
Use the arrow keys to highlight your preferred method and hit enter. I prefer to do mine manually so that is what i chose. If your not too farmilar with this though and your sure you want to use the WHOLE disk you can choose guided.
Note: using guided will wipe the WHOLE disk. Including any operating system or files currently on there
Next we see this
Current partition/disk layout:
Note: Yours will look slightly different.
In this example I'm going to totally wipe the current drive. You DONT have to do this though. You can select the individual partitions and delete or resize them to give use the free space needed to set up our new partitions for this install. You will need at least 2 new partitions. One mount at "/" and a swap. Swap isn't mandatory but i do suggest it. Especially if you have a limited amount of ram.
Select your action and hit enter. Since im going to wipe the drive and start fresh i highlight the drive (not the partitions) and hit enter.
Next we see this
I want to start fresh (wipe the disk). So i select yes. And then hit enter.
Next we see this
As you can see i have wiped the drive (only took a few seconds). There are now no partitions on it at all. Its all free "unpartitioned" space. Now i need to set up my partitions. So i select the free space entry and hit enter.
next we see this
I want to create a new partition. So i select "create new partition" and hit enter.
Next we see this
Now i want to save some space for swap. So i dont use the whole "21.5GB". I usually save about 1GB for swap. So i hit tab until the "text" field is highlighted. 21.5 GB total-1Gb for swap=20.5GB. So i enter 20.5GB in the field. Then i hit tab until the "continue" field is highlighted. Then i hit enter.
Next we see this
We want our main partition set up as "primary". So i highlight that then hit enter.
Next we see this
Highlight beginning and then hit enter.
Next we see this
Here we can edit some of the "properties/settings" of the partition. Now im not going to get into all the different types of filesystems and they're pros and cons.
We do want to make sure we see a few things here though (highlight anyfield and hit enter to edit its properties/setting).
Use as: This is your filesystem type. I suggest ext3.
Format: I suggest setting it to "yes".
Mount point: We need at least one filesystem mounted at "/". If not it wont let us install.
Bootable flag: The boot flag MUST be set to ON for the partition mounted at "/". Otherwise the system wont be bootable.
I also highly suggest leaving "reserved blocks" at "5%" and "mount options" at "defaults".
You can enter a label if you want.
Now we highlight "done setting up the partition" and hit enter.
Next we see this
As you can see it shows the partition we just set up. As well as some free space. Now we will set up our swap partition. Highlight the free space entry and hit enter.
Next we see this
This is where we set the size of out swap partition. It CANT be any larger than the amount of space left though. Obviously. As you can see i have "970.6MB" left. I'm going to use all this as my swap. So i hit tab until the "text" field is highlighted. Then i enter 970.6MB. Then hit tab until "continue" is highlighted. Then hit enter.
Next we see this
This time I choose "logical". This is just a personal preference. You can choose "primary" if you want. But i always use logical. Then hit enter.
Next we want to make sure the setup looks like this
Its very simple. Just highlight "use as" and hit enter. Choose "swap". After choosing swap it should look identical to the above picture. I should also note that we DONT need the boot flag to be set to on. So make sur eits set to "off. It should already be like that though. After it looks just like the picture above we then highlight "done setting up the partition". Then hit enter.
Next we see an overview of all our partitions. As you can see the two partitions i just setup are listed. But we havent wrote the changes to disk yet.
We highlight "finish partitioning and write changes to disk"
Next we see this
Confirmation:
We do want to go ahead and save the partition scheme so we highlight "yes" and hit enter.
Next we see this
Formatting partitions in action:
We can see the progress of the formatting/partition creation. This step might take a few minutes so be patient. No action is needed from us.
next we see this
Installing base system:
Here we can see the progress of the base system. This is just the most basic/core packages. No action needed by us.
Next we see this
Users and passwords-->root password:
Hit tab until the "text" field is highlighted. Enter a password for the root account. Then hit enter. Make sure its something you can remember but thats hard to guess. Then it will ask you to confirm it. Then hit enter again.
Note: I would like to take this time to explain something. In ubuntu and Ultimate Edition we use "sudo" to preform administrative tasks. This differs in debian. In debian there is no sudo. At least not initially. Instead we use the command "su -" then type the root password to preform these tasks. Then use the command "exit" to drop back to our standard user afterwards. The way to tell if you are temporarily root is by looking at the command prompt. If it says "root@hotstname" then you have root privledges. If it says "yourusername@hostname" then you dont. I feel this is actually more secure to a point though. This way only the person that knows the root password can get administrative privledges. Where as in ubuntu anyone could use "sudo" then type they're own password and bam they would have administrative privledges. However it can also be more dangerous if your not careful. How you ask? Say you use "su -" to gain administrative privledges. Then you walk away without using "exit" first. Examples: Phone rings, baby is crying, somebody is at the door, ect. Then anyone can come along a housemate or whatever and do anything they want. Where with sudo it expires after 5mins (i think it is 5mins anyway). And you no longer can gain administrative privledges without knowing the password to YOUR user account. This being said i actually prefer NOT having sudo. However later in this guide i will show you how to setup sudo (i know some ppl would rather use it).
Now back to where we were.
After we confirm the ROOT password we will see the following
Users and passwords-->user full name
Here you can enter the "FULL NAME" for the first user. I usually just use the same as my username though. Hit tab until the "text" field is highlighted then enter your preference. Then hit enter.
Next we see this
Users and password-->username/login name
While this may look just like the previous screen. This is where we actually enter our username (used for login). Hit tab until the "text" field is highlighted then enter your preferred username. Then hit enter.
Next we see this
Enter password:
Now we set up the password for our regular user account. Once again make sure its something you can remember but hard to guess. It should also be different from the ROOT password. Hit tab until the "text" field is highlighted. Then enter your password and hit enter. It will then ask you to confirm it. Just enter it again and hit the enter key.
Next we see this
Configure package manager-->mirror country
This is for choosing a mirror close to you (for the sources.list). Highlight your country then hit enter. Im from the united states so i chose "united states".
Next we see this
Configure package manager-->archive mirror
Here we will pick the actual mirror we want to use. Your list will look slightly different. This is the list for the united states. Highlight the mirror you want to use then hit enter. I usually use "debian.org" but you can chose a different one if you like.
Next we see this
Configure package manager-->proxy info
If you know you need to use a proxy enter the correct info here in the following format (http://user:pass@host:port). I dont need a proxy so i dont enter anything here. Hit enter.
Next we see this
Configuring apt
All this shows is the process of apt. Its actually just updating the sources.list and updating the package list. This may take some time depending on your internet connection speed.
At this time i would like to pass along a neat little thing i found. While the installer is text based you cant actually tell what it is doing deep underneath. However if you hit alt+f4 it will switch to vt4 (virtual terminal #4). Here you can see all the little things that the installer is actually doing. As shown in this shot.
This doesnt interrupt the installer at all either. As you can see its aquiring the package lists. This is actually a very good way to tell if the installer has stalled/froze ir if there are any errors and what not. To get back to the installer terminal (vt1) simply hit alt+f1.
Now after its done updating the package lists we will see the following screen
popularity contest
This is totally your choice. But i prefer not to use it. So i select "no". Its your chose though. Highlight your chose and hit enter.
Next we see this
Select software
Here we select what we want installed.. Hit tab until the red square is in the middle where the choices are. Highlight each selection and REMOVE the "**" from EVERYTHING EXCEPT STANDARD SYSTEM. Use the spacebar to add or remove the "**". If you have a laptop though make sure there is a "**" next to the "laptop" task. By doing this we will only be installing a command line system. But ill show you later how to build up from there. My theory behind this is that its usually best to install the command line system. Followed by xorg and then your "desktop environment" (gnome/kde/xfce/ect ect). Ive found the system generally runs much smoother. After you have only "standard" selected and "laptop" (if and ONLY if you have a laptop). Hit the tab key until the "continue" field is highlighted. Then hit enter.
Next we see this
Retreiving and installing software we selected:
Here you can see the progress of the software install. Now action needed from us.
Next we see this
Install grub:
This asks you to confirm that you want grub installed to the "MBR". I always select yes. If you chose no it will then ask you to specify where you want it installed to. Hightlight your choice then hit enter.
Next we see this
Install finished/reboot:
We are now finished with the initial install. Your cd/dvd try should open on its own. Remove the disc from the tray and close it. Lastly hit enter. The system will now reboot.
Next we see this (hopefully as long as everything went well)
We should boot to a login prompt as shown. Remember we didnt install xorg or a desktop environment yet. We will be do in that soon tho. So right now we just have a command line system.
Keep checking back. We will be upgrading to squeeze "testing" next followed by installing xorg and the core of gnome (we wont install the whole thing only what we ACTUALLY need. Hopefully this guide has been very informative so far.
ULTIMATE EDITION 2.5 X64/ARCHLINUX X64 DUAL BOOT
Antec 900two case
3 antec 120mm tri cool blue led fans (1 rear exaust 2 front intake)
1 antec 220mm "bigboy" tri cool blue led fan (top exaust)
Amd Phenom II X4 955 Black Edition Am3 Cpu OC'D @ 4.2 Rev C3
MSI NF980-G65 Am3 Socket DDR3 Tri-sli ATX Mainboard
Nvidia 980A Sli Chipset
Corsair 2GB Dual Channel ram (1GBx2) DDR3 @ 1600 MHZ
EVGA Nvidia GTS-250 1GB PCI Express Graphics Card
Lite-On Dual Layer Sata Dvd Burner
3x 1TB Seagate Sata Hdd's 32Mb cache
ASUS VH235 23 Inch Lcd Wide Screen Monitor
OCZ ModXStream Pro 700Watt Psu
Rosewill 3.5" Internal USB 2.0 Card Reader w/ Floppy Drive
Antec 900two case
3 antec 120mm tri cool blue led fans (1 rear exaust 2 front intake)
1 antec 220mm "bigboy" tri cool blue led fan (top exaust)
Amd Phenom II X4 955 Black Edition Am3 Cpu OC'D @ 4.2 Rev C3
MSI NF980-G65 Am3 Socket DDR3 Tri-sli ATX Mainboard
Nvidia 980A Sli Chipset
Corsair 2GB Dual Channel ram (1GBx2) DDR3 @ 1600 MHZ
EVGA Nvidia GTS-250 1GB PCI Express Graphics Card
Lite-On Dual Layer Sata Dvd Burner
3x 1TB Seagate Sata Hdd's 32Mb cache
ASUS VH235 23 Inch Lcd Wide Screen Monitor
OCZ ModXStream Pro 700Watt Psu
Rosewill 3.5" Internal USB 2.0 Card Reader w/ Floppy Drive
-
drama - U.E. Master
- Posts: 580
- Joined: Wed Oct 17, 2007 11:26 am
- Location: eastern iowa, united states
- Age: 42
- Operating System: Ultimate Edition 3.2 32 BIT
Re: Debian minimal-->usable desktop install guide(UNFINISHED)
![]() by drama » Sat Apr 04, 2009 11:48 am
by drama » Sat Apr 04, 2009 11:48 am
Ok now that we have our new system installed lets get down to business. Remember we only have a commandline system so far. No gui. No need to worry though we will be fixing that shortly. The commandline isn't nothing to be afraid of either.
When you first reboot ofter the install (remember to remove the cd/dvd from the drive) you should be presented with a login prompt as shown below
Simple type your username and password. Be sure to use the username and pass you setup. Don't use the root password here.
Now since we don't have sudo yet we need to switch to the root account. We do that by using the following command
Be sure there is a space between "su" and the "-". Now type the root password you setup during install.
You should now be at a command prompt that looks similar to this
Yours may not say "debian". But it will have the "#" at the end. That is one way to tell if you have root privledges. If you have a "$" at the end then you have no admin privedges at the moment.
Now that we have admin/root privledges the first thing we wanna to is slightly edit our sources.list (tells use where and what repos to use).
Type the following command
it should look like this initially (yours may look slightly different).
Now while there really isn't anything wrong with this list you will be missing out on some packages. By default debian only installs with the "main" section of the repo enabled. We want to add "contrib and non-free" sections. Think of them like ubuntus "multiverse and universe" sections. Change it so it looks like the one below. You only need to add the stuff thats in RED Its also a good idea to comment out any lines that refer to the install cd/dvd (shown in BLUE). Simply add a "#" in front of those lines. You dont have to do this but it ensures that you dont get asked for the cd/dvd when installing packages. Yours may already be disabled. If that is the case dont worry about it. If you dont have a network connection DONT disable the cdrom entry though.
Now we can save that file. To do this press ctrl+O (thats an O not a zero). Now press ctrl+x to exit the editor.
Now we need to update our package cache. Run the following command
Or if you prefer using apt
I always use aptitude personally but the choice is yours. Im not gonna get into the pros and cons of aptitude vs apt-get. That would be a book in itself. And most of it would just be personal thoughts. I will say this though. The main reason why i use aptitude is for dist-upgrades. Ive seen systems get borked during upgrades using apt-get but have never experienced this with aptitude. I do suggest you choose one or the other and use ONLY that one.
Now we want to make sure our system us fully up to date. It should be but lets just make sure. Run the following command
Or if you prefer apt-get
Next lesson we will upgrade from lenny to squeeze. Its totally optional though.
If your intersted in upgrading GO HERE .
Otherwise GO HERE to continue without upgrading.
When you first reboot ofter the install (remember to remove the cd/dvd from the drive) you should be presented with a login prompt as shown below

Simple type your username and password. Be sure to use the username and pass you setup. Don't use the root password here.
Now since we don't have sudo yet we need to switch to the root account. We do that by using the following command
- Code: Select all
su -
Be sure there is a space between "su" and the "-". Now type the root password you setup during install.
You should now be at a command prompt that looks similar to this
debian:~#
Yours may not say "debian". But it will have the "#" at the end. That is one way to tell if you have root privledges. If you have a "$" at the end then you have no admin privedges at the moment.
Now that we have admin/root privledges the first thing we wanna to is slightly edit our sources.list (tells use where and what repos to use).
Type the following command
- Code: Select all
nano /etc/apt/sources.list
it should look like this initially (yours may look slightly different).
#
# deb cdrom:[Debian GNU/Linux 5.0.0 _Lenny_ - Official i386 NETINST Binary-1 20090214-16:03]/ lenny main
#deb cdrom:[Debian GNU/Linux 5.0.0 _Lenny_ - Official i386 NETINST Binary-1 20090214-16:03]/ lenny main
deb http://ftp.us.debian.org/debian/ lenny main
deb-src http://ftp.us.debian.org/debian/ lenny main
deb http://security.debian.org/ lenny/updates main
deb-src http://security.debian.org/ lenny/updates main
deb http://volatile.debian.org/debian-volatile lenny/volatile main
deb-src http://volatile.debian.org/debian-volatile lenny/volatile main
Now while there really isn't anything wrong with this list you will be missing out on some packages. By default debian only installs with the "main" section of the repo enabled. We want to add "contrib and non-free" sections. Think of them like ubuntus "multiverse and universe" sections. Change it so it looks like the one below. You only need to add the stuff thats in RED Its also a good idea to comment out any lines that refer to the install cd/dvd (shown in BLUE). Simply add a "#" in front of those lines. You dont have to do this but it ensures that you dont get asked for the cd/dvd when installing packages. Yours may already be disabled. If that is the case dont worry about it. If you dont have a network connection DONT disable the cdrom entry though.
#
# deb cdrom:[Debian GNU/Linux 5.0.0 _Lenny_ - Official i386 NETINST Binary-1 20090214-16:03]/ lenny main
#deb cdrom:[Debian GNU/Linux 5.0.0 _Lenny_ - Official i386 NETINST Binary-1 20090214-16:03]/ lenny main
deb http://ftp.us.debian.org/debian/ lenny main contrib non-free
deb-src http://ftp.us.debian.org/debian/ lenny main contrib non-free
deb http://security.debian.org/ lenny/updates main contrib non-free
deb-src http://security.debian.org/ lenny/updates main contrib non-free
deb http://volatile.debian.org/debian-volatile lenny/volatile main contrib non-free
deb-src http://volatile.debian.org/debian-volatile lenny/volatile main contrib non-free
Now we can save that file. To do this press ctrl+O (thats an O not a zero). Now press ctrl+x to exit the editor.
Now we need to update our package cache. Run the following command
- Code: Select all
aptitude update
Or if you prefer using apt
- Code: Select all
apt-get update
I always use aptitude personally but the choice is yours. Im not gonna get into the pros and cons of aptitude vs apt-get. That would be a book in itself. And most of it would just be personal thoughts. I will say this though. The main reason why i use aptitude is for dist-upgrades. Ive seen systems get borked during upgrades using apt-get but have never experienced this with aptitude. I do suggest you choose one or the other and use ONLY that one.
Now we want to make sure our system us fully up to date. It should be but lets just make sure. Run the following command
- Code: Select all
aptitude safe-upgrade
Or if you prefer apt-get
- Code: Select all
apt-get upgrade
Next lesson we will upgrade from lenny to squeeze. Its totally optional though.
If your intersted in upgrading GO HERE .
Otherwise GO HERE to continue without upgrading.
ULTIMATE EDITION 2.5 X64/ARCHLINUX X64 DUAL BOOT
Antec 900two case
3 antec 120mm tri cool blue led fans (1 rear exaust 2 front intake)
1 antec 220mm "bigboy" tri cool blue led fan (top exaust)
Amd Phenom II X4 955 Black Edition Am3 Cpu OC'D @ 4.2 Rev C3
MSI NF980-G65 Am3 Socket DDR3 Tri-sli ATX Mainboard
Nvidia 980A Sli Chipset
Corsair 2GB Dual Channel ram (1GBx2) DDR3 @ 1600 MHZ
EVGA Nvidia GTS-250 1GB PCI Express Graphics Card
Lite-On Dual Layer Sata Dvd Burner
3x 1TB Seagate Sata Hdd's 32Mb cache
ASUS VH235 23 Inch Lcd Wide Screen Monitor
OCZ ModXStream Pro 700Watt Psu
Rosewill 3.5" Internal USB 2.0 Card Reader w/ Floppy Drive
Antec 900two case
3 antec 120mm tri cool blue led fans (1 rear exaust 2 front intake)
1 antec 220mm "bigboy" tri cool blue led fan (top exaust)
Amd Phenom II X4 955 Black Edition Am3 Cpu OC'D @ 4.2 Rev C3
MSI NF980-G65 Am3 Socket DDR3 Tri-sli ATX Mainboard
Nvidia 980A Sli Chipset
Corsair 2GB Dual Channel ram (1GBx2) DDR3 @ 1600 MHZ
EVGA Nvidia GTS-250 1GB PCI Express Graphics Card
Lite-On Dual Layer Sata Dvd Burner
3x 1TB Seagate Sata Hdd's 32Mb cache
ASUS VH235 23 Inch Lcd Wide Screen Monitor
OCZ ModXStream Pro 700Watt Psu
Rosewill 3.5" Internal USB 2.0 Card Reader w/ Floppy Drive
-
drama - U.E. Master
- Posts: 580
- Joined: Wed Oct 17, 2007 11:26 am
- Location: eastern iowa, united states
- Age: 42
- Operating System: Ultimate Edition 3.2 32 BIT
Re: Debian minimal-->usable desktop install guide(UNFINISHED)
![]() by drama » Sat Apr 04, 2009 12:32 pm
by drama » Sat Apr 04, 2009 12:32 pm
I always use testing personally as opposed to using stable. But what is testing you ask.
Testing:
The "testing" distribution contains packages that haven't been accepted into a "stable" release yet, but they are in the queue for that. The main advantage of using this distribution is that it has more recent versions of software. See the Debian FAQ for more information on what is "testing" and how it becomes "stable". The current "testing" distribution is squeeze. This release started as a copy of lenny (the current stable), and is currently in a state called "testing". That means that things should not break as badly as in unstable or experimental distributions, because packages are allowed to enter this distribution only after a certain period of time has passed, and when they don't have any release-critical bugs filed against them.
The reason why i use testing is mainly because i like to have packages that are more up to date. I also have never had a package or system break while using it. That doesn't mean it never happens. It just means i have never experienced it in the 3 years ive been using debian. I was on lenny the WHOLE time it was classified as "testing". So i thought i would give the info on doing the up grade from our newly installed lenny system to testing "squeeze". THIS IS COMPLETELY OPTIONAL. YOU DONT HAVE TO UPGRADE IF YOU DON'T WANT.
The first thing we need to do is slightly edit our sources.list to do that we run the following command
After it opens we will be presented with a list that looks similar to this
Now change lenny to squeeze.
Note: But dont change it in the reference to VOLATILE. The is no testing "squeeze" repo for volatile yet. And there most likely wont be one for another 4-6 months. This is the same way things were when lenny was classified as "testing". You can either leave the volatile reference as lenny or comment it out by adding a "#" at the beginning of those lines. I left it as lenny and havent had any problems.
Now a little info on what "volatile" is.
SOURCE: The debian-volatile Project
Anyway we want our sources.list to look like this Only the parts in RED need changed
Now save the file. To do this we press ctrl+O (thats an O not a zero). Then press ctrl+x to exit the editor.
Now we need to update the package cache to reflect the new repos. To do that we run the following command
Or if you use apt-get
It will download the new package archives.
Now we will start the upgrade. Run the following command
Or if you use apt-get
It will download and install the new packages. Its a relatively small download (50.3MB as of 04/04/09). During the installation of the new packages a dialouge may pop up asking you to stop some services. This is fine. Dont change anything there just hit enter. Among these services are "openbsd-inetd exim4 cron atd".
After the upgrade is completed we want to reboot. This is always a good idea after an upgrade. To do that we run the following command
Now let me take a minute to explain the above command
"shutdown" is telling the system we want to shut down. "now" is telling the system when we want it done. This could also be a date and time (using the -t switch). "-r" tells the system the reason is to do a reboot. If we just wanted to shutdown and NOT do a reboot in place of "-r" we would use "-h" (halt) followed by "-P" (-P means that the reason for a halt is to turn the power off).
After the system comes back up you will be presented with a login prompt. Type your username and hit enter. The type your password. Now switch to the root account by using teh following command
Note the space.
Now type the password for the root account.
Now even though we just did a upgrade we are going to run one more upgrade command just to make sure the system is fully upgraded.
Or if you use apt-get
It may or may not grab a few more packages.
Now the reason why we ran safe-upgrade then dist-upgrade is because sometimes not everything can be installed/upgraded all at once without borking the system. So we run safe-upgrade first.
If it installed anything reboot one more time
If it didnt install anything more then there is no need to reboot.
Now run the following command
If the upgrade was successful it should return the following
Thats it. You are now on the testing distro.
Testing:
The "testing" distribution contains packages that haven't been accepted into a "stable" release yet, but they are in the queue for that. The main advantage of using this distribution is that it has more recent versions of software. See the Debian FAQ for more information on what is "testing" and how it becomes "stable". The current "testing" distribution is squeeze. This release started as a copy of lenny (the current stable), and is currently in a state called "testing". That means that things should not break as badly as in unstable or experimental distributions, because packages are allowed to enter this distribution only after a certain period of time has passed, and when they don't have any release-critical bugs filed against them.
The reason why i use testing is mainly because i like to have packages that are more up to date. I also have never had a package or system break while using it. That doesn't mean it never happens. It just means i have never experienced it in the 3 years ive been using debian. I was on lenny the WHOLE time it was classified as "testing". So i thought i would give the info on doing the up grade from our newly installed lenny system to testing "squeeze". THIS IS COMPLETELY OPTIONAL. YOU DONT HAVE TO UPGRADE IF YOU DON'T WANT.
The first thing we need to do is slightly edit our sources.list to do that we run the following command
- Code: Select all
nano /etc/apt/sources.list
After it opens we will be presented with a list that looks similar to this
#
# deb cdrom:[Debian GNU/Linux 5.0.0 _Lenny_ - Official i386 NETINST Binary-1 20090214-16:03]/ lenny main
#deb cdrom:[Debian GNU/Linux 5.0.0 _Lenny_ - Official i386 NETINST Binary-1 20090214-16:03]/ lenny main
deb http://ftp.us.debian.org/debian/ lenny main contrib non-free
deb-src http://ftp.us.debian.org/debian/ lenny main contrib non-free
deb http://security.debian.org/ lenny/updates main contrib non-free
deb-src http://security.debian.org/ lenny/updates main contrib non-free
deb http://volatile.debian.org/debian-volatile lenny/volatile main contrib non-free
deb-src http://volatile.debian.org/debian-volatile lenny/volatile main contrib non-free
Now change lenny to squeeze.
Note: But dont change it in the reference to VOLATILE. The is no testing "squeeze" repo for volatile yet. And there most likely wont be one for another 4-6 months. This is the same way things were when lenny was classified as "testing". You can either leave the volatile reference as lenny or comment it out by adding a "#" at the beginning of those lines. I left it as lenny and havent had any problems.
Now a little info on what "volatile" is.
The debian-volatile Project wrote:What is debian-volatile?
Some packages aim at fast moving targets, such as spam filtering and virus scanning, and even when using updated data patterns, they do not really work for the full time of a stable release. The main goal of volatile is allowing system administrators to update their systems in a nice, consistent way, without getting the drawbacks of using unstable, even without getting the drawbacks for the selected packages. So debian-volatile will only contain changes to stable programs that are necessary to keep them functional.
SOURCE: The debian-volatile Project
Anyway we want our sources.list to look like this Only the parts in RED need changed
#
# deb cdrom:[Debian GNU/Linux 5.0.0 _Lenny_ - Official i386 NETINST Binary-1 20090214-16:03]/ lenny main
#deb cdrom:[Debian GNU/Linux 5.0.0 _Lenny_ - Official i386 NETINST Binary-1 20090214-16:03]/ lenny main
deb http://ftp.us.debian.org/debian/ squeeze main contrib non-free
deb-src http://ftp.us.debian.org/debian/ squeeze main contrib non-free
deb http://security.debian.org/ squeeze/updates main contrib non-free
deb-src http://security.debian.org/ squeeze/updates main contrib non-free
deb http://volatile.debian.org/debian-volatile lenny/volatile main contrib non-free
deb-src http://volatile.debian.org/debian-volatile lenny/volatile main contrib non-free
Now save the file. To do this we press ctrl+O (thats an O not a zero). Then press ctrl+x to exit the editor.
Now we need to update the package cache to reflect the new repos. To do that we run the following command
- Code: Select all
aptitude update
Or if you use apt-get
- Code: Select all
apt-get update
It will download the new package archives.
Now we will start the upgrade. Run the following command
- Code: Select all
aptitude safe-upgrade
Or if you use apt-get
- Code: Select all
apt-get upgrade
It will download and install the new packages. Its a relatively small download (50.3MB as of 04/04/09). During the installation of the new packages a dialouge may pop up asking you to stop some services. This is fine. Dont change anything there just hit enter. Among these services are "openbsd-inetd exim4 cron atd".
After the upgrade is completed we want to reboot. This is always a good idea after an upgrade. To do that we run the following command
- Code: Select all
shutdown now -r
Now let me take a minute to explain the above command
"shutdown" is telling the system we want to shut down. "now" is telling the system when we want it done. This could also be a date and time (using the -t switch). "-r" tells the system the reason is to do a reboot. If we just wanted to shutdown and NOT do a reboot in place of "-r" we would use "-h" (halt) followed by "-P" (-P means that the reason for a halt is to turn the power off).
After the system comes back up you will be presented with a login prompt. Type your username and hit enter. The type your password. Now switch to the root account by using teh following command
- Code: Select all
su -
Note the space.
Now type the password for the root account.
Now even though we just did a upgrade we are going to run one more upgrade command just to make sure the system is fully upgraded.
- Code: Select all
aptitude dist-upgrade
Or if you use apt-get
- Code: Select all
apt-get dist-upgrade
It may or may not grab a few more packages.
Now the reason why we ran safe-upgrade then dist-upgrade is because sometimes not everything can be installed/upgraded all at once without borking the system. So we run safe-upgrade first.
If it installed anything reboot one more time
- Code: Select all
shutdown now -r
If it didnt install anything more then there is no need to reboot.
Now run the following command
- Code: Select all
cat /etc/debian_version
If the upgrade was successful it should return the following
squeeze/sid
Thats it. You are now on the testing distro.
ULTIMATE EDITION 2.5 X64/ARCHLINUX X64 DUAL BOOT
Antec 900two case
3 antec 120mm tri cool blue led fans (1 rear exaust 2 front intake)
1 antec 220mm "bigboy" tri cool blue led fan (top exaust)
Amd Phenom II X4 955 Black Edition Am3 Cpu OC'D @ 4.2 Rev C3
MSI NF980-G65 Am3 Socket DDR3 Tri-sli ATX Mainboard
Nvidia 980A Sli Chipset
Corsair 2GB Dual Channel ram (1GBx2) DDR3 @ 1600 MHZ
EVGA Nvidia GTS-250 1GB PCI Express Graphics Card
Lite-On Dual Layer Sata Dvd Burner
3x 1TB Seagate Sata Hdd's 32Mb cache
ASUS VH235 23 Inch Lcd Wide Screen Monitor
OCZ ModXStream Pro 700Watt Psu
Rosewill 3.5" Internal USB 2.0 Card Reader w/ Floppy Drive
Antec 900two case
3 antec 120mm tri cool blue led fans (1 rear exaust 2 front intake)
1 antec 220mm "bigboy" tri cool blue led fan (top exaust)
Amd Phenom II X4 955 Black Edition Am3 Cpu OC'D @ 4.2 Rev C3
MSI NF980-G65 Am3 Socket DDR3 Tri-sli ATX Mainboard
Nvidia 980A Sli Chipset
Corsair 2GB Dual Channel ram (1GBx2) DDR3 @ 1600 MHZ
EVGA Nvidia GTS-250 1GB PCI Express Graphics Card
Lite-On Dual Layer Sata Dvd Burner
3x 1TB Seagate Sata Hdd's 32Mb cache
ASUS VH235 23 Inch Lcd Wide Screen Monitor
OCZ ModXStream Pro 700Watt Psu
Rosewill 3.5" Internal USB 2.0 Card Reader w/ Floppy Drive
-
drama - U.E. Master
- Posts: 580
- Joined: Wed Oct 17, 2007 11:26 am
- Location: eastern iowa, united states
- Age: 42
- Operating System: Ultimate Edition 3.2 32 BIT
Re: Debian minimal-->usable desktop install guide(UNFINISHED)
![]() by drama » Sat Apr 04, 2009 1:15 pm
by drama » Sat Apr 04, 2009 1:15 pm
As of right now we still have just a basic commandline system. However now its time to start changing that. In this "lesson we will add the "xserver".
First make sure you are logged in with your user name. Now switch to root
Note the space. Now type the root password.
Now is a good time to add another repo to our list. Debian multimedia. It contains codecs and many other multimedia based packages (flash, mplayer, vlc, mythtv). Its a good idea to have this one.
To add the repo run the following command
If your on stable "lenny" IE you didnt upgrade then use these 2 lines
Or if your on testing "squeeze" meaning you upgraded then use these 2 lines
Note: ONLY add the lines for the version your using. DONT add both lenny and testing. Just one OR the other.
Now save this file by pressing ctrl+O (thats an O not a zero). Now press ctrl+x to exit the editor.
Now we need to grab the "keyring" package so that aptitude dont start complaining. To do this run the following commands
This switches to a temporary directory.
Now download the keyring to that directory using the following command
Now install it using the following command
Now we remove the file we downloaded since we no longer need it. To do that we use the following command
Now leave the temp directory
Next make sure the package list is up to date. Run the following command
Or if you use apt-get
It will download some data and update the package list. Now we want to start installing the xserver.
To do that we want to run the following command
Or if you use apt-get
It will download quite a few packages (around 100 i believe including the dependancies) but its still a fairly small download (approx 50MB). It will then start installing them.
The install of the xserver is now complete and we are one step closer to having a gui. Its probobally a good idea to reboot at this time. To do that run the following command
First make sure you are logged in with your user name. Now switch to root
- Code: Select all
su -
Note the space. Now type the root password.
Now is a good time to add another repo to our list. Debian multimedia. It contains codecs and many other multimedia based packages (flash, mplayer, vlc, mythtv). Its a good idea to have this one.
To add the repo run the following command
- Code: Select all
nano /etc/apt/sources.list
If your on stable "lenny" IE you didnt upgrade then use these 2 lines
Or if your on testing "squeeze" meaning you upgraded then use these 2 lines
deb http://www.debian-multimedia.org squeeze main
deb-src http://www.debian-multimedia.org squeeze main
Note: ONLY add the lines for the version your using. DONT add both lenny and testing. Just one OR the other.
Now save this file by pressing ctrl+O (thats an O not a zero). Now press ctrl+x to exit the editor.
Now we need to grab the "keyring" package so that aptitude dont start complaining. To do this run the following commands
- Code: Select all
cd /tmp
This switches to a temporary directory.
Now download the keyring to that directory using the following command
- Code: Select all
wget http://www.debian-multimedia.org/pool/main/d/debian-multimedia-keyring/debian-multimedia-keyring_2008.10.16_all.deb
Now install it using the following command
- Code: Select all
dpkg -i debian-multimedia-keyring_2008.10.16_all.deb
Now we remove the file we downloaded since we no longer need it. To do that we use the following command
- Code: Select all
rm debian-multimedia-keyring_2008.10.16_all.deb
Now leave the temp directory
- Code: Select all
cd
Next make sure the package list is up to date. Run the following command
- Code: Select all
aptitude update
Or if you use apt-get
- Code: Select all
apt-get update
It will download some data and update the package list. Now we want to start installing the xserver.
To do that we want to run the following command
- Code: Select all
aptitude install xorg-docs xorg xserver-xorg-core xserver-xorg
Or if you use apt-get
- Code: Select all
apt-get install xorg-docs xorg xserver-xorg-core xserver-xorg
It will download quite a few packages (around 100 i believe including the dependancies) but its still a fairly small download (approx 50MB). It will then start installing them.
The install of the xserver is now complete and we are one step closer to having a gui. Its probobally a good idea to reboot at this time. To do that run the following command
- Code: Select all
shutdown now -r
ULTIMATE EDITION 2.5 X64/ARCHLINUX X64 DUAL BOOT
Antec 900two case
3 antec 120mm tri cool blue led fans (1 rear exaust 2 front intake)
1 antec 220mm "bigboy" tri cool blue led fan (top exaust)
Amd Phenom II X4 955 Black Edition Am3 Cpu OC'D @ 4.2 Rev C3
MSI NF980-G65 Am3 Socket DDR3 Tri-sli ATX Mainboard
Nvidia 980A Sli Chipset
Corsair 2GB Dual Channel ram (1GBx2) DDR3 @ 1600 MHZ
EVGA Nvidia GTS-250 1GB PCI Express Graphics Card
Lite-On Dual Layer Sata Dvd Burner
3x 1TB Seagate Sata Hdd's 32Mb cache
ASUS VH235 23 Inch Lcd Wide Screen Monitor
OCZ ModXStream Pro 700Watt Psu
Rosewill 3.5" Internal USB 2.0 Card Reader w/ Floppy Drive
Antec 900two case
3 antec 120mm tri cool blue led fans (1 rear exaust 2 front intake)
1 antec 220mm "bigboy" tri cool blue led fan (top exaust)
Amd Phenom II X4 955 Black Edition Am3 Cpu OC'D @ 4.2 Rev C3
MSI NF980-G65 Am3 Socket DDR3 Tri-sli ATX Mainboard
Nvidia 980A Sli Chipset
Corsair 2GB Dual Channel ram (1GBx2) DDR3 @ 1600 MHZ
EVGA Nvidia GTS-250 1GB PCI Express Graphics Card
Lite-On Dual Layer Sata Dvd Burner
3x 1TB Seagate Sata Hdd's 32Mb cache
ASUS VH235 23 Inch Lcd Wide Screen Monitor
OCZ ModXStream Pro 700Watt Psu
Rosewill 3.5" Internal USB 2.0 Card Reader w/ Floppy Drive
-
drama - U.E. Master
- Posts: 580
- Joined: Wed Oct 17, 2007 11:26 am
- Location: eastern iowa, united states
- Age: 42
- Operating System: Ultimate Edition 3.2 32 BIT
Re: Debian minimal-->usable desktop install guide(UNFINISHED)
![]() by drama » Sat Apr 04, 2009 2:47 pm
by drama » Sat Apr 04, 2009 2:47 pm
So far we have downloaded our installation media. We have done a minimal install (commandline only). We have added the extra debian repos (contrib non-free). We have added the debian-multimedia repo (contains aall the multimedia packages. Flash,mplayer, codecs, mythtv, ect). Added the secure key for the debian-multimedia repo. We upgraded from lenny to testing "squeeze". We have learned a few basic commandline options. We added our xserver. Our system is starting to come together.
Now in this lesson we will add our desktop environment. Gnome in this case since i think that is what most people use (we will add enlightment, xfce and kde later on). As well as a login manager (gdm). Gdm is optional. I personally dont use it or any login manager but in the interest of making sure this guide is complete i will add that as an optional step. We will also setup sudo. Also optional.
Make sure you are logged in with your username. Then switch to the root account using the following command
Note the space.
Then enter the password for the root account.
Next we wanna make sure our package lists are fully updated. To do this we will run the following command
Or if you use apt-get
It will download a small amount of data and update the package list. Now we want to install gnome. We will be using gnome-core though. This way we dont pull in EVERYTHING that gnome offers. This allows us to install only the core then later on install only those packages that we actually need. This saves bandwidth, hard drive space and some memory. Plus it will give use a cleaner leaner system with everything we need and nothing that we dont.
Note: The difference between gnome-core and gnome-desktop is drastic. For gnome-core we only pull in approx 200mb in approx 315 packages which will occupy approx 540mb of space. Where as gnome-desktop (this is the full gnome) downloads 432mb installs 535 packages and uses a staggering 1100mb of space. Yes by only installing gnome-core we do lose some functionality. But we can easily add that in if we need it WITHOUT grabbing the full package set.
Anyway lets get started. To install our lean mean version of gnome we simply run the following command
Or if you use aptitude
It will download approx 200mb worth of data then begin installing the packages. After it finishes we will setup sudo and install gdm. Both optional steps.
Note: If you choose not to install gdm you will have to login at the commandline with YOUR username then use the command startx in order to get a gui.
OPTIONAL STEP
Now that our installation of gnome is finished and we now have the "sudo" package (its pulled in with gnome-core). We will now setup sudo so we dont have to use the root account.
To do this we will first run the following command
That will open the sudoers file while should look something like this
Ignore this line
Not quite sure why that warning is in there. VIM (vi) is NOT needed plus its alot more complicated.
Anyway look for this line
Just below that line add the names of any users (one username per line) that you want to be able to gain administrative rights using the "sudo" command. This is the format you would use
Of course substitute Then add a empty line below the last username (hit enter).
So we would end up with something that looks like this
Notice the line in RED. Of course you wouldnt use "drama". You would use your username instead. This is just what mine looks like. Posted it so you could get an idea how it should look.
Now save that file. To do this press ctrl+O (thats an O not a zero). Now press ctrl+x to exit the editor. Now exit the root account using the following command
You can now use the command "sudo" at the beginning of any command that requires root privledges instead of using "su -". Such as "aptitude install" and "apt-get install".
OPTIONAL STEP
Now we will add a login manager (gdm). This isnt needed but i know some people like to have one. If you dont want a login manager you can just login from the commandline with your user name then use the following command
The startx command will start the xserver and your desktop enviroinment.
Anyway to install gdm run the following command (if you setup sudo be sure to add sudo at the beginning)
Or if you use apt-get
Now reboot the system using the following command
Add sudo to the beginning if you set it up.
Thats all now when you reboot you should get a login manager (gdm) just type your username and password into the box and your desktop will load.
If you didnt install gdm just login using your username and password (from command line) then use this command and you should load straight to the desktop.
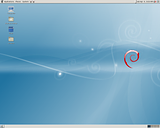
We now have a gui that looks similar to this
Now in this lesson we will add our desktop environment. Gnome in this case since i think that is what most people use (we will add enlightment, xfce and kde later on). As well as a login manager (gdm). Gdm is optional. I personally dont use it or any login manager but in the interest of making sure this guide is complete i will add that as an optional step. We will also setup sudo. Also optional.
Make sure you are logged in with your username. Then switch to the root account using the following command
- Code: Select all
su -
Note the space.
Then enter the password for the root account.
Next we wanna make sure our package lists are fully updated. To do this we will run the following command
- Code: Select all
aptitude update
Or if you use apt-get
- Code: Select all
apt-get update
It will download a small amount of data and update the package list. Now we want to install gnome. We will be using gnome-core though. This way we dont pull in EVERYTHING that gnome offers. This allows us to install only the core then later on install only those packages that we actually need. This saves bandwidth, hard drive space and some memory. Plus it will give use a cleaner leaner system with everything we need and nothing that we dont.
Note: The difference between gnome-core and gnome-desktop is drastic. For gnome-core we only pull in approx 200mb in approx 315 packages which will occupy approx 540mb of space. Where as gnome-desktop (this is the full gnome) downloads 432mb installs 535 packages and uses a staggering 1100mb of space. Yes by only installing gnome-core we do lose some functionality. But we can easily add that in if we need it WITHOUT grabbing the full package set.
Anyway lets get started. To install our lean mean version of gnome we simply run the following command
- Code: Select all
aptitude install gnome-core
Or if you use aptitude
- Code: Select all
apt-get install gnome-core
It will download approx 200mb worth of data then begin installing the packages. After it finishes we will setup sudo and install gdm. Both optional steps.
Note: If you choose not to install gdm you will have to login at the commandline with YOUR username then use the command startx in order to get a gui.
OPTIONAL STEP
Now that our installation of gnome is finished and we now have the "sudo" package (its pulled in with gnome-core). We will now setup sudo so we dont have to use the root account.
To do this we will first run the following command
- Code: Select all
nano /etc/sudoers
That will open the sudoers file while should look something like this
# /etc/sudoers
#
# This file MUST be edited with the 'visudo' command as root.
#
# See the man page for details on how to write a sudoers file.
#
Defaults env_reset
# Host alias specification
# User alias specification
# Cmnd alias specification
# User privilege specification
root ALL=(ALL) ALL
# Uncomment to allow members of group sudo to not need a password
# (Note that later entries override this, so you might need to move
# it further down)
# %sudo ALL=NOPASSWD: ALL
Ignore this line
# This file MUST be edited with the 'visudo' command as root.
Not quite sure why that warning is in there. VIM (vi) is NOT needed plus its alot more complicated.
Anyway look for this line
# User privilege specification
root ALL=(ALL) ALL
Just below that line add the names of any users (one username per line) that you want to be able to gain administrative rights using the "sudo" command. This is the format you would use
yourusername ALL=(ALL) ALL
Of course substitute Then add a empty line below the last username (hit enter).
So we would end up with something that looks like this
# /etc/sudoers
#
# This file MUST be edited with the 'visudo' command as root.
#
# See the man page for details on how to write a sudoers file.
#
Defaults env_reset
# Host alias specification
# User alias specification
# Cmnd alias specification
# User privilege specification
root ALL=(ALL) ALL
drama ALL=(ALL) ALL
# Uncomment to allow members of group sudo to not need a password
# (Note that later entries override this, so you might need to move
# it further down)
# %sudo ALL=NOPASSWD: ALL
Notice the line in RED. Of course you wouldnt use "drama". You would use your username instead. This is just what mine looks like. Posted it so you could get an idea how it should look.
Now save that file. To do this press ctrl+O (thats an O not a zero). Now press ctrl+x to exit the editor. Now exit the root account using the following command
- Code: Select all
exit
You can now use the command "sudo" at the beginning of any command that requires root privledges instead of using "su -". Such as "aptitude install" and "apt-get install".
OPTIONAL STEP
Now we will add a login manager (gdm). This isnt needed but i know some people like to have one. If you dont want a login manager you can just login from the commandline with your user name then use the following command
- Code: Select all
startx
The startx command will start the xserver and your desktop enviroinment.
Anyway to install gdm run the following command (if you setup sudo be sure to add sudo at the beginning)
- Code: Select all
aptitude install xnest gdm gdm-themes xserver-xephyr xbase-clients
Or if you use apt-get
- Code: Select all
apt-get install xnest gdm gdm-themes xserver-xephyr xbase-clients
Now reboot the system using the following command
- Code: Select all
shutdown now -r
Add sudo to the beginning if you set it up.
Thats all now when you reboot you should get a login manager (gdm) just type your username and password into the box and your desktop will load.
If you didnt install gdm just login using your username and password (from command line) then use this command and you should load straight to the desktop.
- Code: Select all
startx
We now have a gui that looks similar to this

ULTIMATE EDITION 2.5 X64/ARCHLINUX X64 DUAL BOOT
Antec 900two case
3 antec 120mm tri cool blue led fans (1 rear exaust 2 front intake)
1 antec 220mm "bigboy" tri cool blue led fan (top exaust)
Amd Phenom II X4 955 Black Edition Am3 Cpu OC'D @ 4.2 Rev C3
MSI NF980-G65 Am3 Socket DDR3 Tri-sli ATX Mainboard
Nvidia 980A Sli Chipset
Corsair 2GB Dual Channel ram (1GBx2) DDR3 @ 1600 MHZ
EVGA Nvidia GTS-250 1GB PCI Express Graphics Card
Lite-On Dual Layer Sata Dvd Burner
3x 1TB Seagate Sata Hdd's 32Mb cache
ASUS VH235 23 Inch Lcd Wide Screen Monitor
OCZ ModXStream Pro 700Watt Psu
Rosewill 3.5" Internal USB 2.0 Card Reader w/ Floppy Drive
Antec 900two case
3 antec 120mm tri cool blue led fans (1 rear exaust 2 front intake)
1 antec 220mm "bigboy" tri cool blue led fan (top exaust)
Amd Phenom II X4 955 Black Edition Am3 Cpu OC'D @ 4.2 Rev C3
MSI NF980-G65 Am3 Socket DDR3 Tri-sli ATX Mainboard
Nvidia 980A Sli Chipset
Corsair 2GB Dual Channel ram (1GBx2) DDR3 @ 1600 MHZ
EVGA Nvidia GTS-250 1GB PCI Express Graphics Card
Lite-On Dual Layer Sata Dvd Burner
3x 1TB Seagate Sata Hdd's 32Mb cache
ASUS VH235 23 Inch Lcd Wide Screen Monitor
OCZ ModXStream Pro 700Watt Psu
Rosewill 3.5" Internal USB 2.0 Card Reader w/ Floppy Drive
-
drama - U.E. Master
- Posts: 580
- Joined: Wed Oct 17, 2007 11:26 am
- Location: eastern iowa, united states
- Age: 42
- Operating System: Ultimate Edition 3.2 32 BIT
Re: Debian minimal-->usable desktop install guide(UNFINISHED)
![]() by drama » Mon Apr 06, 2009 3:27 am
by drama » Mon Apr 06, 2009 3:27 am
We now have our desktop installed (gnome). Now its time to start turning it into a very usable system.
This is what we have so far
desktop:
Now lets go through the various menus and submenus
applications--->accessories
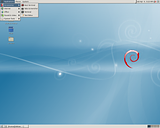
applications--->office
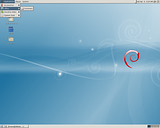
applications---> sound and video
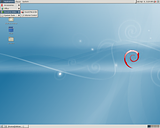
applications--->system tools
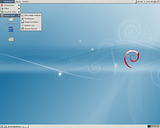
system--->preferences
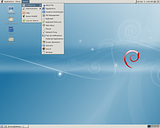
system--->administration
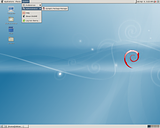
Very basic but also very light. Check out the memory usage. Only 71.6mb used.
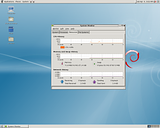
Now that we have explored the desktop a little lets do some work. First off to the right of the menus there is 2 little spring/platform looking things. these are shortcuts but they dont point to anywhere. Lets remove them. Right click each of them then choose "remove". This is shown in the image below.
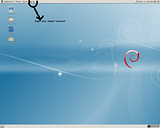
Now that we got rid of those lets install a web browser. We will use "iceweasel". At least for now. For those that dont know "iceweasel" is a debranded version of firefox. Actually it is firefox just under a different name.
To install it run the following command
Or if you use apt-get
Add sudo to the beginning if you need to. Iif you dont use sudo login as root using the su - command.
Now this is what we end up with (it will be under applications--->internet)
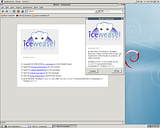
See looks exactly like firefox.
Now we will add a shortcut to our main bar at the top. Remember where removed those 2 dead shortcuts? Yep thats right. That is exactly where we will put it.
First right click right next to "system" then choose "add to panel"
You will then see a screen that looks like this
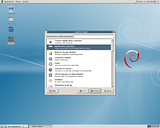
Click on "application launcher-copy a launcher from the applications menu"
Now a screen like this will appear. Click the arrow next to "internet" then click on "iceweasel web browser" as shown in the picture
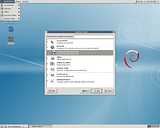
Then click the "add" button.
as you can see in this picture we now have the shortcut on our bar at the top where its very easily to access.
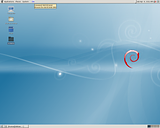
We aren't quite done yet though. Now right click the icon and click "move". Now drag it over to the left as far as it will go. Now left click to break the move operation. Right click on more time and choose "lock" this will ensure the icon doesn't get moved over.
Our next task is getting our sound working
You might have noticed the speaker icon up in the taskbar on the top right has a Red "x" through it. This is because it is permantly muted due to the fact that alsa isnt set up yet. So lets fix that.
First we need to install a few required packages. To do that run the following command
Or if you use apt-get
Add sudo at the beginning of the command if you set it up. Otherwise switch to root using the su - command.
Drama edit start Alsaconf no longer exists. Supposably you just have to raise the mixer levels and thats it. I have a gut feeling the fact alsaconf isnt there anymore is gon cause issues. ill test this and give more info later
Now start the configuration script. To do this run the following command
The first screen you see will look like this
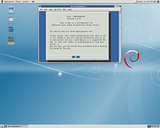
Use tab to highlight the ok button and press enter
Next you will see a screen like this
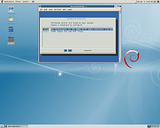
Use tab to highlight the card you prefer to use and hit enter
Next you will see a screen like this
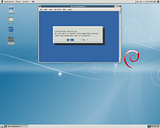
Use tab to highlight the yes button then hit enter.
Next you see something similar to this
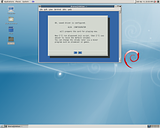
Use tab to highlight the ok button and hit enter.
Drama edit end
Next you should see something that looks like this
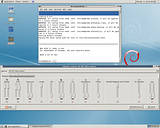
SUCCESS! As you can see i have opened the mixer (right click the speaker icon and choose open volume control) no more red "x" either.
Our next task is setting up the "network manager applet".
As you can see the network manager icon isnt showing in our taskbar. Lets fix this.
First lets grab a nice set of packages. Some of these are mandatory the rest will give use some added functionality. Among these are "ping, netstat, traceroute, whois, add users and groups through the gui, edit our network settings, switch networks on the fly".
To do this run the following command
Or if you use apt-get
Add sudo at the beginning of the command if you set it up. Otherwise switch to root using the su - command.
Now reboot.
After the system comes back up and you login the network manager should be shown. As it is in the following screenshot

Optional step
Now we will add the "networkselector" also known as "netapplet" to the list session applications.
In the menu go to system--->preferences--->sessions
Then click "add"
Now we need to fill in some info
Name: Network Selector
Command: netapplet
Comment: Network Selector Panel Applet
As is shown in this screenshot
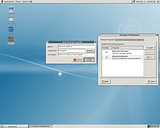
Now click ok and then reboot.
After we reboot this is what we end up with.
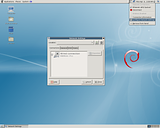
As you can see we now have a very easily accessable way to switch and edit networks.
Optional step
You might have noticed that the gui based program "update manager" is missing. Well we dont really need it.
We have 2 choices.
1: we can continue without it. The following commands do exactly the same thing that it does
If you use aptitude
Then
And lastly
If you use apt-get
Then
And lastly
The second option would be to add the update manager. That is what we will do next. The choice is yours though. you can use the commands listed above or the update manager.
To install the update manager run the following command
Or if you use apt-get
Add sudo at the beginning of the command if you set it up. Otherwise switch to root using the su - command.
You should now have "update manager" located under system--->administration--->update manager
This concludes this lesson. In our next lession we will be adding our proprietary (non open source) video drivers. An optional step of course.
This is what we have so far
desktop:
Now lets go through the various menus and submenus
applications--->accessories

applications--->office

applications---> sound and video

applications--->system tools

system--->preferences

system--->administration

Very basic but also very light. Check out the memory usage. Only 71.6mb used.

Now that we have explored the desktop a little lets do some work. First off to the right of the menus there is 2 little spring/platform looking things. these are shortcuts but they dont point to anywhere. Lets remove them. Right click each of them then choose "remove". This is shown in the image below.

Now that we got rid of those lets install a web browser. We will use "iceweasel". At least for now. For those that dont know "iceweasel" is a debranded version of firefox. Actually it is firefox just under a different name.
To install it run the following command
- Code: Select all
aptitude install iceweasel
Or if you use apt-get
- Code: Select all
apt-get install iceweasel
Add sudo to the beginning if you need to. Iif you dont use sudo login as root using the su - command.
Now this is what we end up with (it will be under applications--->internet)

See looks exactly like firefox.
Now we will add a shortcut to our main bar at the top. Remember where removed those 2 dead shortcuts? Yep thats right. That is exactly where we will put it.
First right click right next to "system" then choose "add to panel"
You will then see a screen that looks like this

Click on "application launcher-copy a launcher from the applications menu"
Now a screen like this will appear. Click the arrow next to "internet" then click on "iceweasel web browser" as shown in the picture

Then click the "add" button.
as you can see in this picture we now have the shortcut on our bar at the top where its very easily to access.

We aren't quite done yet though. Now right click the icon and click "move". Now drag it over to the left as far as it will go. Now left click to break the move operation. Right click on more time and choose "lock" this will ensure the icon doesn't get moved over.
Our next task is getting our sound working
You might have noticed the speaker icon up in the taskbar on the top right has a Red "x" through it. This is because it is permantly muted due to the fact that alsa isnt set up yet. So lets fix that.
First we need to install a few required packages. To do that run the following command
- Code: Select all
aptitude install alsa-base alsa-tools alsa-utils
Or if you use apt-get
- Code: Select all
apt-get install alsa-base alsa-tools alsa-utils
Add sudo at the beginning of the command if you set it up. Otherwise switch to root using the su - command.
Drama edit start Alsaconf no longer exists. Supposably you just have to raise the mixer levels and thats it. I have a gut feeling the fact alsaconf isnt there anymore is gon cause issues. ill test this and give more info later
Now start the configuration script. To do this run the following command
- Code: Select all
alsaconf
The first screen you see will look like this

Use tab to highlight the ok button and press enter
Next you will see a screen like this

Use tab to highlight the card you prefer to use and hit enter
Next you will see a screen like this

Use tab to highlight the yes button then hit enter.
Next you see something similar to this

Use tab to highlight the ok button and hit enter.
Drama edit end
Next you should see something that looks like this

SUCCESS! As you can see i have opened the mixer (right click the speaker icon and choose open volume control) no more red "x" either.
Our next task is setting up the "network manager applet".
As you can see the network manager icon isnt showing in our taskbar. Lets fix this.
First lets grab a nice set of packages. Some of these are mandatory the rest will give use some added functionality. Among these are "ping, netstat, traceroute, whois, add users and groups through the gui, edit our network settings, switch networks on the fly".
To do this run the following command
- Code: Select all
aptitude install gnome-system-tools consolekit dhcdbd gnome-network-admin libck-connector0 libiw29 libnl1 libnm-util0 libpam-ck-connector libpcsclite1 libpkcs11-helper1 libpolkit-gnome0 libpolkit-grant2 network-config network-manager network-manager-gnome network-manager-openvpn network-manager-openvpn-gnome network-manager-vpnc network-manager-vpnc-gnome openssl-blacklist openvpn openvpn-blacklist policykit policykit-gnome resolvconf vpnc wireless-tools wpasupplicant ethtool finger gnome-nettool ifupdown-extra ifupdown-scripts-zg2 iputils-arping netapplet
Or if you use apt-get
- Code: Select all
apt-get install gnome-system-tools consolekit dhcdbd gnome-network-admin libck-connector0 libiw29 libnl1 libnm-util0 libpam-ck-connector libpcsclite1 libpkcs11-helper1 libpolkit-gnome0 libpolkit-grant2 network-config network-manager network-manager-gnome network-manager-openvpn network-manager-openvpn-gnome network-manager-vpnc network-manager-vpnc-gnome openssl-blacklist openvpn openvpn-blacklist policykit policykit-gnome resolvconf vpnc wireless-tools wpasupplicant ethtool finger gnome-nettool ifupdown-extra ifupdown-scripts-zg2 iputils-arping netapplet
Add sudo at the beginning of the command if you set it up. Otherwise switch to root using the su - command.
Now reboot.
After the system comes back up and you login the network manager should be shown. As it is in the following screenshot

Optional step
Now we will add the "networkselector" also known as "netapplet" to the list session applications.
In the menu go to system--->preferences--->sessions
Then click "add"
Now we need to fill in some info
Name: Network Selector
Command: netapplet
Comment: Network Selector Panel Applet
As is shown in this screenshot

Now click ok and then reboot.
After we reboot this is what we end up with.

As you can see we now have a very easily accessable way to switch and edit networks.
Optional step
You might have noticed that the gui based program "update manager" is missing. Well we dont really need it.
We have 2 choices.
1: we can continue without it. The following commands do exactly the same thing that it does
If you use aptitude
- Code: Select all
aptitude update
Then
- Code: Select all
aptitude safe-upgrade
And lastly
- Code: Select all
aptitude dist-upgrade
If you use apt-get
- Code: Select all
apt-get update
Then
- Code: Select all
apt-get upgrade
And lastly
- Code: Select all
apt-get dist-upgrade
The second option would be to add the update manager. That is what we will do next. The choice is yours though. you can use the commands listed above or the update manager.
To install the update manager run the following command
- Code: Select all
aptitude install update-manager update-manager-core update-notifier update-notifier-common
Or if you use apt-get
- Code: Select all
apt-get install update-manager update-manager-core update-notifier update-notifier-common
Add sudo at the beginning of the command if you set it up. Otherwise switch to root using the su - command.
You should now have "update manager" located under system--->administration--->update manager
This concludes this lesson. In our next lession we will be adding our proprietary (non open source) video drivers. An optional step of course.
ULTIMATE EDITION 2.5 X64/ARCHLINUX X64 DUAL BOOT
Antec 900two case
3 antec 120mm tri cool blue led fans (1 rear exaust 2 front intake)
1 antec 220mm "bigboy" tri cool blue led fan (top exaust)
Amd Phenom II X4 955 Black Edition Am3 Cpu OC'D @ 4.2 Rev C3
MSI NF980-G65 Am3 Socket DDR3 Tri-sli ATX Mainboard
Nvidia 980A Sli Chipset
Corsair 2GB Dual Channel ram (1GBx2) DDR3 @ 1600 MHZ
EVGA Nvidia GTS-250 1GB PCI Express Graphics Card
Lite-On Dual Layer Sata Dvd Burner
3x 1TB Seagate Sata Hdd's 32Mb cache
ASUS VH235 23 Inch Lcd Wide Screen Monitor
OCZ ModXStream Pro 700Watt Psu
Rosewill 3.5" Internal USB 2.0 Card Reader w/ Floppy Drive
Antec 900two case
3 antec 120mm tri cool blue led fans (1 rear exaust 2 front intake)
1 antec 220mm "bigboy" tri cool blue led fan (top exaust)
Amd Phenom II X4 955 Black Edition Am3 Cpu OC'D @ 4.2 Rev C3
MSI NF980-G65 Am3 Socket DDR3 Tri-sli ATX Mainboard
Nvidia 980A Sli Chipset
Corsair 2GB Dual Channel ram (1GBx2) DDR3 @ 1600 MHZ
EVGA Nvidia GTS-250 1GB PCI Express Graphics Card
Lite-On Dual Layer Sata Dvd Burner
3x 1TB Seagate Sata Hdd's 32Mb cache
ASUS VH235 23 Inch Lcd Wide Screen Monitor
OCZ ModXStream Pro 700Watt Psu
Rosewill 3.5" Internal USB 2.0 Card Reader w/ Floppy Drive
-
drama - U.E. Master
- Posts: 580
- Joined: Wed Oct 17, 2007 11:26 am
- Location: eastern iowa, united states
- Age: 42
- Operating System: Ultimate Edition 3.2 32 BIT
Re: Debian minimal-->usable desktop install guide(UNFINISHED)
![]() by drama » Mon Apr 06, 2009 8:30 am
by drama » Mon Apr 06, 2009 8:30 am
Optional step
In this lesson we will be installing and/or building our graphics drivers. If you know that the proprietary (non open source) drivers either dont work with your graphics card or you dont use them then you can skip this step.
First we need to get some info on our video chip. If you already know had chip you have you can skip this step.
To do this we need to install "lshw"
Or if you use apt-get
Add sudo at the beginning of the command if you set it up. Otherwise switch to root using the su - command.
Now issue the following command (either using sudo at the beginning or switch to root using the su - command)
Here is the result i got when runing the command (yours will be different)
This tells me that i have an ati radeon xpress 200. Which is correct.
Now we have 2 choices. We can use the pre-built drivers from the repo. Or we can build our own. Personally i always build my own so i can be sure to always have the latest version. In the interest of keeping this guide complete i will show you how to do it both ways.
Note: ONLY select one method or the other.
Ati graphics cards
NOTE: Nvidia will be added HERE at a later date
Using the prebuilt packages
Run the following command to install the pre build packages from the repos (be sure to following the instructions for your os archatecture). I say OS archatecture and not cpu because not everyone that has a 64bit capable cpu actually uses the amd64/x64 "64 bit" os. Also i should not that the "amd64" designation as far as operating systems goes isnt just for amd cpu's like the name would imply. Intel has 64bit cpus too (core2 duo e6600 and up i believe) for these you can also use the "amd64" version of the operating system.
If you either cant remember or arent sure what you installed (i386 "32bit" or amd64 "64bit") simply run the following command
If you are using amd64 "64 bit" you will get a result similar to this
The numbers my differ. The important part is the part after the numbers. I have highlighted this in red.
If it says amd64 then use the amd64 instructions. If it says anything other than amd64 then use the i386 instructions.
I386/x86 "32 bit"
Or if you use apt-get
amd64/x64 "64 bit"
Add sudo at the beginning of the command if you set it up. Otherwise switch to root using the su - command.
Next we need to build and install the kernel module. To do this we run the following command
Add sudo at the beginning of the command if you set it up. Otherwise switch to root using the su - command.
It will ask you to download a few additional packages. You must choose yes. Then it will automatically build and install the kernel module.
After that is finished we need to do a little configuration. Run the following 2 commands
Add sudo at the beginning of the command if you set it up. Otherwise switch to root using the su - command.
Now we must reboot. This is mandatory.
After the system comes back up we need to add a few more things to our xorg.conf
Run the following command
The "X11" is case sensitive. I must be a capital "X"
Add sudo at the beginning of the command if you set it up. Otherwise switch to root using the su - command.
That will open up our xorg configuration file for editing.
We need to add the following things
In the "server layout" section we need
Option "AIGLX" "True"
In the "device" section we need
Option "XAANoOffscreenPixmaps" "on"
Option "UseFastTLS" "1"
Then we need to add the following 2 parts/sections to the bottom of the file
Section "DRI"
Mode 0666
EndSection
Section "Extensions"
Option "RENDER" "Enable"
Option "DAMAGE" "Enable"
Option "Composite" "Enable"
Option "XVideo" "Enable"
EndSection
I have posted my xorg.conf below so you can have a visual representation of what it should look like. ONLY pay attention to the parts in red. DO NOT COPY AND PASTE MY WHOLE FILE
Now save that file. Then we have to run one more command to make sure the changes stick
Add sudo at the beginning of the command if you set it up. Otherwise switch to root using the su - command.
Now reboot one last time.
When the system comes back up we will run a few commands to make sure everything was successful
It should return something similar to this
Pay very close attention to the parts in RED. Your render and version strings may vary slightly from mine. This is normal. As long as it says ati and NOT mesa then it was successful.
Now we will check to make sure dri (direct rendering/hardware acceleration is working). To do this run the following command
It should return the following
Note: Manual build is currently broken so ill have to wait until a later date to add that
In this lesson we will be installing and/or building our graphics drivers. If you know that the proprietary (non open source) drivers either dont work with your graphics card or you dont use them then you can skip this step.
First we need to get some info on our video chip. If you already know had chip you have you can skip this step.
To do this we need to install "lshw"
- Code: Select all
aptitude install lshw lshw-gtk
Or if you use apt-get
- Code: Select all
apt-get install lshw lshw-gtk
Add sudo at the beginning of the command if you set it up. Otherwise switch to root using the su - command.
Now issue the following command (either using sudo at the beginning or switch to root using the su - command)
- Code: Select all
lshw -C video
Here is the result i got when runing the command (yours will be different)
*-display UNCLAIMED
description: VGA compatible controller
product: RS480 [Radeon Xpress 200G Series]
vendor: ATI Technologies Inc
physical id: 5
bus info: pci@0000:01:05.0
version: 00
width: 32 bits
clock: 66MHz
capabilities: pm vga_controller bus_master cap_list
configuration: latency=64 mingnt=8
This tells me that i have an ati radeon xpress 200. Which is correct.
Now we have 2 choices. We can use the pre-built drivers from the repo. Or we can build our own. Personally i always build my own so i can be sure to always have the latest version. In the interest of keeping this guide complete i will show you how to do it both ways.
Note: ONLY select one method or the other.
Ati graphics cards
NOTE: Nvidia will be added HERE at a later date
Using the prebuilt packages
Run the following command to install the pre build packages from the repos (be sure to following the instructions for your os archatecture). I say OS archatecture and not cpu because not everyone that has a 64bit capable cpu actually uses the amd64/x64 "64 bit" os. Also i should not that the "amd64" designation as far as operating systems goes isnt just for amd cpu's like the name would imply. Intel has 64bit cpus too (core2 duo e6600 and up i believe) for these you can also use the "amd64" version of the operating system.
If you either cant remember or arent sure what you installed (i386 "32bit" or amd64 "64bit") simply run the following command
- Code: Select all
uname -r
If you are using amd64 "64 bit" you will get a result similar to this
2.6.26-2-amd64
The numbers my differ. The important part is the part after the numbers. I have highlighted this in red.
If it says amd64 then use the amd64 instructions. If it says anything other than amd64 then use the i386 instructions.
I386/x86 "32 bit"
- Code: Select all
aptitude install module-assistant build-essential fakeroot dh-make debconf bzip2 wget debhelper libstdc++5 linux-headers-$(uname -r) fglrx-driver fglrx-kernel-src fglrx-glx fglrx-atieventsd fglrx-control mesa-utils
Or if you use apt-get
- Code: Select all
apt-get install module-assistant build-essential fakeroot dh-make debconf bzip2 wget debhelper libstdc++5 linux-headers-$(uname -r) fglrx-driver fglrx-kernel-src fglrx-glx fglrx-atieventsd fglrx-control mesa-utils
amd64/x64 "64 bit"
- Code: Select all
aptitude install module-assistant build-essential fakeroot dh-make debconf bzip2 wget debhelper libstdc++5 linux-headers-$(uname -r) ia32-libs fglrx-driver fglrx-kernel-src fglrx-glx fglrx-atieventsd fglrx-control mesa-utils
- Code: Select all
apt-get install module-assistant build-essential fakeroot dh-make debconf bzip2 wget debhelper libstdc++5 linux-headers-$(uname -r) ia32-libs fglrx-driver fglrx-kernel-src fglrx-glx fglrx-atieventsd fglrx-control mesa-utils
Add sudo at the beginning of the command if you set it up. Otherwise switch to root using the su - command.
Next we need to build and install the kernel module. To do this we run the following command
- Code: Select all
module-assistant auto-install fglrx-kernel-src
Add sudo at the beginning of the command if you set it up. Otherwise switch to root using the su - command.
It will ask you to download a few additional packages. You must choose yes. Then it will automatically build and install the kernel module.
After that is finished we need to do a little configuration. Run the following 2 commands
- Code: Select all
aticonfig --initial --force
- Code: Select all
aticonfig --overlay-type=Xv --force
Add sudo at the beginning of the command if you set it up. Otherwise switch to root using the su - command.
Now we must reboot. This is mandatory.
After the system comes back up we need to add a few more things to our xorg.conf
Run the following command
- Code: Select all
gedit /etc/X11/xorg.conf
The "X11" is case sensitive. I must be a capital "X"
Add sudo at the beginning of the command if you set it up. Otherwise switch to root using the su - command.
That will open up our xorg configuration file for editing.
We need to add the following things
In the "server layout" section we need
Option "AIGLX" "True"
In the "device" section we need
Option "XAANoOffscreenPixmaps" "on"
Option "UseFastTLS" "1"
Then we need to add the following 2 parts/sections to the bottom of the file
Section "DRI"
Mode 0666
EndSection
Section "Extensions"
Option "RENDER" "Enable"
Option "DAMAGE" "Enable"
Option "Composite" "Enable"
Option "XVideo" "Enable"
EndSection
I have posted my xorg.conf below so you can have a visual representation of what it should look like. ONLY pay attention to the parts in red. DO NOT COPY AND PASTE MY WHOLE FILE
# xorg.conf (X.Org X Window System server configuration file)
#
# This file was generated by dexconf, the Debian X Configuration tool, using
# values from the debconf database.
#
# Edit this file with caution, and see the xorg.conf manual page.
# (Type "man xorg.conf" at the shell prompt.)
#
# This file is automatically updated on xserver-xorg package upgrades *only*
# if it has not been modified since the last upgrade of the xserver-xorg
# package.
#
# If you have edited this file but would like it to be automatically updated
# again, run the following command:
# sudo dpkg-reconfigure -phigh xserver-xorg
Section "ServerLayout"
Identifier "aticonfig Layout"
Screen 0 "aticonfig-Screen[0]-0" 0 0
Option "AIGLX" "True"
EndSection
Section "Files"
EndSection
Section "Module"
EndSection
Section "InputDevice"
Identifier "Generic Keyboard"
Driver "kbd"
Option "XkbRules" "xorg"
Option "XkbModel" "pc104"
Option "XkbLayout" "us"
EndSection
Section "InputDevice"
Identifier "Configured Mouse"
Driver "mouse"
EndSection
Section "Monitor"
Identifier "aticonfig-Monitor[0]-0"
Option "VendorName" "ATI Proprietary Driver"
Option "ModelName" "Generic Autodetecting Monitor"
Option "DPMS" "true"
EndSection
Section "Device"
Identifier "aticonfig-Device[0]-0"
Driver "fglrx"
Option "VideoOverlay" "on"
Option "OpenGLOverlay" "off"
Option "XAANoOffscreenPixmaps" "on"
Option "UseFastTLS" "1"
BusID "PCI:1:5:0"
EndSection
Section "Screen"
Identifier "aticonfig-Screen[0]-0"
Device "aticonfig-Device[0]-0"
Monitor "aticonfig-Monitor[0]-0"
DefaultDepth 24
SubSection "Display"
Viewport 0 0
Depth 24
EndSubSection
EndSection
Section "DRI"
Mode 0666
EndSection
Section "Extensions"
Option "RENDER" "Enable"
Option "DAMAGE" "Enable"
Option "Composite" "Enable"
Option "XVideo" "Enable"
EndSection
Now save that file. Then we have to run one more command to make sure the changes stick
- Code: Select all
aticonfig --input=/etc/X11/xorg.conf --tls=1
Add sudo at the beginning of the command if you set it up. Otherwise switch to root using the su - command.
Now reboot one last time.
When the system comes back up we will run a few commands to make sure everything was successful
- Code: Select all
fglrxinfo
It should return something similar to this
display: :0.0 screen: 0
OpenGL vendor string: ATI Technologies Inc.
OpenGL renderer string: ATI Radeon Xpress Series
OpenGL version string: 2.1.8494 Release
Pay very close attention to the parts in RED. Your render and version strings may vary slightly from mine. This is normal. As long as it says ati and NOT mesa then it was successful.
Now we will check to make sure dri (direct rendering/hardware acceleration is working). To do this run the following command
- Code: Select all
glxinfo | grep direct
It should return the following
direct rendering: Yes
Note: Manual build is currently broken so ill have to wait until a later date to add that
ULTIMATE EDITION 2.5 X64/ARCHLINUX X64 DUAL BOOT
Antec 900two case
3 antec 120mm tri cool blue led fans (1 rear exaust 2 front intake)
1 antec 220mm "bigboy" tri cool blue led fan (top exaust)
Amd Phenom II X4 955 Black Edition Am3 Cpu OC'D @ 4.2 Rev C3
MSI NF980-G65 Am3 Socket DDR3 Tri-sli ATX Mainboard
Nvidia 980A Sli Chipset
Corsair 2GB Dual Channel ram (1GBx2) DDR3 @ 1600 MHZ
EVGA Nvidia GTS-250 1GB PCI Express Graphics Card
Lite-On Dual Layer Sata Dvd Burner
3x 1TB Seagate Sata Hdd's 32Mb cache
ASUS VH235 23 Inch Lcd Wide Screen Monitor
OCZ ModXStream Pro 700Watt Psu
Rosewill 3.5" Internal USB 2.0 Card Reader w/ Floppy Drive
Antec 900two case
3 antec 120mm tri cool blue led fans (1 rear exaust 2 front intake)
1 antec 220mm "bigboy" tri cool blue led fan (top exaust)
Amd Phenom II X4 955 Black Edition Am3 Cpu OC'D @ 4.2 Rev C3
MSI NF980-G65 Am3 Socket DDR3 Tri-sli ATX Mainboard
Nvidia 980A Sli Chipset
Corsair 2GB Dual Channel ram (1GBx2) DDR3 @ 1600 MHZ
EVGA Nvidia GTS-250 1GB PCI Express Graphics Card
Lite-On Dual Layer Sata Dvd Burner
3x 1TB Seagate Sata Hdd's 32Mb cache
ASUS VH235 23 Inch Lcd Wide Screen Monitor
OCZ ModXStream Pro 700Watt Psu
Rosewill 3.5" Internal USB 2.0 Card Reader w/ Floppy Drive
-
drama - U.E. Master
- Posts: 580
- Joined: Wed Oct 17, 2007 11:26 am
- Location: eastern iowa, united states
- Age: 42
- Operating System: Ultimate Edition 3.2 32 BIT
Re: Debian minimal-->usable desktop install guide(UNFINISHED)
![]() by drama » Mon Apr 06, 2009 8:31 am
by drama » Mon Apr 06, 2009 8:31 am
Nvidia driver installation will be added here at a later date
ULTIMATE EDITION 2.5 X64/ARCHLINUX X64 DUAL BOOT
Antec 900two case
3 antec 120mm tri cool blue led fans (1 rear exaust 2 front intake)
1 antec 220mm "bigboy" tri cool blue led fan (top exaust)
Amd Phenom II X4 955 Black Edition Am3 Cpu OC'D @ 4.2 Rev C3
MSI NF980-G65 Am3 Socket DDR3 Tri-sli ATX Mainboard
Nvidia 980A Sli Chipset
Corsair 2GB Dual Channel ram (1GBx2) DDR3 @ 1600 MHZ
EVGA Nvidia GTS-250 1GB PCI Express Graphics Card
Lite-On Dual Layer Sata Dvd Burner
3x 1TB Seagate Sata Hdd's 32Mb cache
ASUS VH235 23 Inch Lcd Wide Screen Monitor
OCZ ModXStream Pro 700Watt Psu
Rosewill 3.5" Internal USB 2.0 Card Reader w/ Floppy Drive
Antec 900two case
3 antec 120mm tri cool blue led fans (1 rear exaust 2 front intake)
1 antec 220mm "bigboy" tri cool blue led fan (top exaust)
Amd Phenom II X4 955 Black Edition Am3 Cpu OC'D @ 4.2 Rev C3
MSI NF980-G65 Am3 Socket DDR3 Tri-sli ATX Mainboard
Nvidia 980A Sli Chipset
Corsair 2GB Dual Channel ram (1GBx2) DDR3 @ 1600 MHZ
EVGA Nvidia GTS-250 1GB PCI Express Graphics Card
Lite-On Dual Layer Sata Dvd Burner
3x 1TB Seagate Sata Hdd's 32Mb cache
ASUS VH235 23 Inch Lcd Wide Screen Monitor
OCZ ModXStream Pro 700Watt Psu
Rosewill 3.5" Internal USB 2.0 Card Reader w/ Floppy Drive
-
drama - U.E. Master
- Posts: 580
- Joined: Wed Oct 17, 2007 11:26 am
- Location: eastern iowa, united states
- Age: 42
- Operating System: Ultimate Edition 3.2 32 BIT
Re: Debian minimal-->usable desktop install guide(UNFINISHED)
![]() by drama » Mon Apr 06, 2009 9:27 am
by drama » Mon Apr 06, 2009 9:27 am
Now we are going to setup our "apt.conf" file. We want to stop it from marking "suggested and recommended" packages as dependancies. I'm not sure exactly why it was set to mark them like that but it adds alot of unneeded packages over time. So lets fix that. Run the following command
Add sudo at the beginning of the command if you set it up. Otherwise switch to root using the su - command.
Add the following to the file
Now save it and exit the editor.
Update the package list. To do that run the following command
Or if you use apt-get
Add sudo at the beginning of the command if you set it up. Otherwise switch to root using the su - command.
Next we will start getting our desktop ready for audio and video playback.
First we need to get our codecs.
I386/x86 "32 bit" users
Or if you use apt-get
AMD64/x64 "64 bit" users
Or if you use apt-get
Add sudo at the beginning of the command if you set it up. Otherwise switch to root using the su - command.
Optional step: Flash
If you want to be able to view flash that is used on various sites (youtube ect). Then we need to install the flash player/plugin. To do this run the following command
Or if you use apt-get
Add sudo to the beginning if you set it up otherwise switch to root using the "su -" command.
Now we will move on to our audio/video players.
Now im not going to list every option here. And really we dont need a whole host of audio and video players on our system. 1 or 2 at the most for audio and another 1 or 2 for video should suffice. But i do encourage you to explore and check out other players until you find something that fits you best then get rid of those that dont.
AUDIO
Amarok
Amarok is actually my preferred audio player. It will pull in some kde libraries though. But it wont actually pull in kde. So if you want to run a pure gnome system (no kde libraries at all) it might not fit in with what you want. But like i said it doesnt actually pull in the kde desktop. It can be a little resource hungry at times though. Supports every format i have ever thrown at it. Great playlist management. Ipod support (also supports many other external players). Can work together with a mysql database for managing your music collection.
To install amarok we will run the following command
Or if you use apt-get
Add sudo at the beginning of the command if you set it up. Otherwise switch to root using the su - command.
Optional step: Install and setup mysql
Mysql isnt totally mandatory. Sqlite does work for managing your music collection. However if you have a very large collection like i do (over 50,000 files) searching will take awhile and amarok might hang. So we will now take care of that step. If you dont want to install mysql or have a rather small collection you can skip this step if you like.
We need to grab a few packages to get mysql going.
Run the following command
Or if you use apt-get
Add sudo at the beginning of the command if you set it up. Otherwise switch to root using the su - command.
The needed packages will then download and install.
Next we will be asked to enter a password for the "mysql "root" account.
Be sure to use a password that you can remember. It will also ask you to confirm it.
Now lets do some configuration and secure our mysql real quick.
Add sudo at the beginning of the command if you set it up. Otherwise switch to root using the su - command.
Add sudo at the beginning of the command if you set it up. Otherwise switch to root using the su - command.
The first thing it will ask for is the root password. Enter the password you setup for the ROOT MYSQL account previously
Next it will ask you if you want to change the root pass. You can enter "n" here for no.
Next it will ask to remove the anonymous users. I suggest you enter "y" for yes.
Next it will ask you to disallow root login remotely. I suggest you enter "y" for yes.
Next it will ask you to remove test database and access to it. I suggest you enter "y" for yes.
Next it will ask you to reload privilege tables. I suggest you enter "y" for yes.
Now we need to login to the mysql system and setup a user and database for use with amarok.
Run the following command
Replace "yourpass" with the mysql root password that you setup. Without the quotes.
Note: there is NO space between -p and the password so if the password was funny you would use mysql -u root -pfunny
Next run the following commands. This will create the database and user for use with amarok
Replace 'YourPassword' with any password of your choice. Be sure to remember it though.The ' ' still need to be on either side of the password as well as the ; at the end. so if you used debian as your password it would look like this
GRANT ALL ON amarokdb.* TO amarok@localhost IDENTIFIED BY 'debian';
Next run this command
And lastly to leave the mysql setup run this command
Now on to the configuration for amarok
First open up amarok
Applications--->sound and video--->amarok.
When you open it up for the first time the first run wizard will start. Click next until you see a screen that looks like this
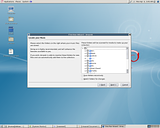
This is where we set up where amarok will look for our audio files.
Place a check next to the following 2 boxes "scan folders recursively" and "watch folders for changes". Now go through the list of folders above and place a check next to the folders were your audio files are or where you will put them. This will be totally dependant on your preference. I use put a folder at /multimedia give all CURRENT users read/write permissions for that folder and save all my audio and video files there. This is my personal choice though. If your the only user you can just make a folder in your home directory save everything there and not have to worry about permissions since you always have read/write permissions for your home folder (/home/"your username").
Next we see a screen that looks like this
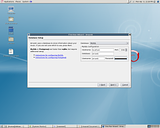
If you didnt setup mysql you can skip this step
Click the "database" drop down box and select "mysql". Next to hostname enter "localhost". Next to database enter "amarokdb" (the screenshot is wrong...it says amarok for the database but it should be amarokdb). For user enter "amarok". For password enter the password to setup earlier when we made the database (NOT the mysql root password but the password you set for amarok).
Click next then finish. We are all done.
Special thanks to thee mahn for his tutorial on amarok/mysql
Audacious
Audacious is a lightweight audio player (using about 5-10mb ram here). Its very similar to the now discontinued xmms. And very much like winamp on windows. To install it run the following command
Or if you use apt-get
Add sudo at the beginning of the command if you set it up. Otherwise switch to root using the su - command.
Video players
vlc (video lan client)
This will install the player and the browser plugin
Or if you use apt-get
Mplayer
Or if you use apt-get
Xine
Or if you use apt-get
All of the above players will play the majority of audio files too. But they lack collection/library abilities (as far as i can tell).
Enable dvd playback
By default debian isnt setup to allow dvd playback. This is very easy to fix though. Simply run the following command to allow dvd playback (you will of course need a video player of some sort too).
Or if you use apt-get
- Code: Select all
gedit /etc/apt/apt.conf
Add sudo at the beginning of the command if you set it up. Otherwise switch to root using the su - command.
Add the following to the file
APT::Install-Recommends "0";
APT::Install-Suggests "0";
Now save it and exit the editor.
Update the package list. To do that run the following command
- Code: Select all
aptitude update
Or if you use apt-get
- Code: Select all
apt-get update
Add sudo at the beginning of the command if you set it up. Otherwise switch to root using the su - command.
Next we will start getting our desktop ready for audio and video playback.
First we need to get our codecs.
I386/x86 "32 bit" users
- Code: Select all
aptitude install w32codecs
Or if you use apt-get
- Code: Select all
apt-get install w32codecs
AMD64/x64 "64 bit" users
- Code: Select all
aptitude install w64codecs
Or if you use apt-get
- Code: Select all
apt-get install w64codecs
Add sudo at the beginning of the command if you set it up. Otherwise switch to root using the su - command.
Optional step: Flash
If you want to be able to view flash that is used on various sites (youtube ect). Then we need to install the flash player/plugin. To do this run the following command
- Code: Select all
aptitude install flashplayer-mozilla gsfonts-x11 libnss-mdns
Or if you use apt-get
- Code: Select all
apt-get install flashplayer-mozilla gsfonts-x11 libnss-mdns
Add sudo to the beginning if you set it up otherwise switch to root using the "su -" command.
Now we will move on to our audio/video players.
Now im not going to list every option here. And really we dont need a whole host of audio and video players on our system. 1 or 2 at the most for audio and another 1 or 2 for video should suffice. But i do encourage you to explore and check out other players until you find something that fits you best then get rid of those that dont.
AUDIO
Amarok
Amarok is actually my preferred audio player. It will pull in some kde libraries though. But it wont actually pull in kde. So if you want to run a pure gnome system (no kde libraries at all) it might not fit in with what you want. But like i said it doesnt actually pull in the kde desktop. It can be a little resource hungry at times though. Supports every format i have ever thrown at it. Great playlist management. Ipod support (also supports many other external players). Can work together with a mysql database for managing your music collection.
To install amarok we will run the following command
- Code: Select all
aptitude install amarok amarok-common amarok-engines amarok-engine-xine
Or if you use apt-get
- Code: Select all
apt-get install amarok amarok-common amarok-engines amarok-engine-xine
Add sudo at the beginning of the command if you set it up. Otherwise switch to root using the su - command.
Optional step: Install and setup mysql
Mysql isnt totally mandatory. Sqlite does work for managing your music collection. However if you have a very large collection like i do (over 50,000 files) searching will take awhile and amarok might hang. So we will now take care of that step. If you dont want to install mysql or have a rather small collection you can skip this step if you like.
We need to grab a few packages to get mysql going.
Run the following command
- Code: Select all
aptitude install mysql-client mysql-server mysql-admin mysql-gui-tools-common mysql-navigator mysqltuner sqlite3
Or if you use apt-get
- Code: Select all
apt-get install mysql-client mysql-server mysql-admin mysql-gui-tools-common mysql-navigator mysqltuner sqlite3
Add sudo at the beginning of the command if you set it up. Otherwise switch to root using the su - command.
The needed packages will then download and install.
Next we will be asked to enter a password for the "mysql "root" account.
Be sure to use a password that you can remember. It will also ask you to confirm it.
Now lets do some configuration and secure our mysql real quick.
- Code: Select all
cd /usr/local
- Code: Select all
mysql_install_db
Add sudo at the beginning of the command if you set it up. Otherwise switch to root using the su - command.
- Code: Select all
/usr/bin/mysql_secure_installation
Add sudo at the beginning of the command if you set it up. Otherwise switch to root using the su - command.
The first thing it will ask for is the root password. Enter the password you setup for the ROOT MYSQL account previously
Next it will ask you if you want to change the root pass. You can enter "n" here for no.
Next it will ask to remove the anonymous users. I suggest you enter "y" for yes.
Next it will ask you to disallow root login remotely. I suggest you enter "y" for yes.
Next it will ask you to remove test database and access to it. I suggest you enter "y" for yes.
Next it will ask you to reload privilege tables. I suggest you enter "y" for yes.
- Code: Select all
cd
Now we need to login to the mysql system and setup a user and database for use with amarok.
Run the following command
- Code: Select all
mysql -u root -p"yourpass"
Replace "yourpass" with the mysql root password that you setup. Without the quotes.
Note: there is NO space between -p and the password so if the password was funny you would use mysql -u root -pfunny
Next run the following commands. This will create the database and user for use with amarok
- Code: Select all
CREATE DATABASE amarokdb;
- Code: Select all
USE amarokdb;
- Code: Select all
GRANT ALL ON amarokdb.* TO amarok@localhost IDENTIFIED BY 'YourPassword';
Replace 'YourPassword' with any password of your choice. Be sure to remember it though.The ' ' still need to be on either side of the password as well as the ; at the end. so if you used debian as your password it would look like this
GRANT ALL ON amarokdb.* TO amarok@localhost IDENTIFIED BY 'debian';
Next run this command
flush privileges;
And lastly to leave the mysql setup run this command
- Code: Select all
exit
Now on to the configuration for amarok
First open up amarok
Applications--->sound and video--->amarok.
When you open it up for the first time the first run wizard will start. Click next until you see a screen that looks like this

This is where we set up where amarok will look for our audio files.
Place a check next to the following 2 boxes "scan folders recursively" and "watch folders for changes". Now go through the list of folders above and place a check next to the folders were your audio files are or where you will put them. This will be totally dependant on your preference. I use put a folder at /multimedia give all CURRENT users read/write permissions for that folder and save all my audio and video files there. This is my personal choice though. If your the only user you can just make a folder in your home directory save everything there and not have to worry about permissions since you always have read/write permissions for your home folder (/home/"your username").
Next we see a screen that looks like this
If you didnt setup mysql you can skip this step
Click the "database" drop down box and select "mysql". Next to hostname enter "localhost". Next to database enter "amarokdb" (the screenshot is wrong...it says amarok for the database but it should be amarokdb). For user enter "amarok". For password enter the password to setup earlier when we made the database (NOT the mysql root password but the password you set for amarok).
Click next then finish. We are all done.
Special thanks to thee mahn for his tutorial on amarok/mysql
Audacious
Audacious is a lightweight audio player (using about 5-10mb ram here). Its very similar to the now discontinued xmms. And very much like winamp on windows. To install it run the following command
- Code: Select all
aptitude install audacious audacious-plugins-extra
Or if you use apt-get
- Code: Select all
apt-get install audacious audacious-plugins-extra
Add sudo at the beginning of the command if you set it up. Otherwise switch to root using the su - command.
Video players
vlc (video lan client)
This will install the player and the browser plugin
- Code: Select all
aptitude install vlc mozilla-plugin-vlc
Or if you use apt-get
- Code: Select all
apt-get install vlc mozilla-plugin-vlc
Mplayer
- Code: Select all
aptitude install mplayer mozilla-mplayer
Or if you use apt-get
- Code: Select all
apt-get install mplayer mozilla-mplayer
Xine
- Code: Select all
aptitude install xine xine-ui xine-plugin libxine1-all-plugins
Or if you use apt-get
- Code: Select all
apt-get install xine xine-ui xine-plugin libxine1-all-plugins
All of the above players will play the majority of audio files too. But they lack collection/library abilities (as far as i can tell).
Enable dvd playback
By default debian isnt setup to allow dvd playback. This is very easy to fix though. Simply run the following command to allow dvd playback (you will of course need a video player of some sort too).
- Code: Select all
aptitude install libdvdread4 libdvdnav4 libdvdcss2
Or if you use apt-get
- Code: Select all
apt-get install libdvdread4 libdvdnav4 libdvdcss2
ULTIMATE EDITION 2.5 X64/ARCHLINUX X64 DUAL BOOT
Antec 900two case
3 antec 120mm tri cool blue led fans (1 rear exaust 2 front intake)
1 antec 220mm "bigboy" tri cool blue led fan (top exaust)
Amd Phenom II X4 955 Black Edition Am3 Cpu OC'D @ 4.2 Rev C3
MSI NF980-G65 Am3 Socket DDR3 Tri-sli ATX Mainboard
Nvidia 980A Sli Chipset
Corsair 2GB Dual Channel ram (1GBx2) DDR3 @ 1600 MHZ
EVGA Nvidia GTS-250 1GB PCI Express Graphics Card
Lite-On Dual Layer Sata Dvd Burner
3x 1TB Seagate Sata Hdd's 32Mb cache
ASUS VH235 23 Inch Lcd Wide Screen Monitor
OCZ ModXStream Pro 700Watt Psu
Rosewill 3.5" Internal USB 2.0 Card Reader w/ Floppy Drive
Antec 900two case
3 antec 120mm tri cool blue led fans (1 rear exaust 2 front intake)
1 antec 220mm "bigboy" tri cool blue led fan (top exaust)
Amd Phenom II X4 955 Black Edition Am3 Cpu OC'D @ 4.2 Rev C3
MSI NF980-G65 Am3 Socket DDR3 Tri-sli ATX Mainboard
Nvidia 980A Sli Chipset
Corsair 2GB Dual Channel ram (1GBx2) DDR3 @ 1600 MHZ
EVGA Nvidia GTS-250 1GB PCI Express Graphics Card
Lite-On Dual Layer Sata Dvd Burner
3x 1TB Seagate Sata Hdd's 32Mb cache
ASUS VH235 23 Inch Lcd Wide Screen Monitor
OCZ ModXStream Pro 700Watt Psu
Rosewill 3.5" Internal USB 2.0 Card Reader w/ Floppy Drive
-
drama - U.E. Master
- Posts: 580
- Joined: Wed Oct 17, 2007 11:26 am
- Location: eastern iowa, united states
- Age: 42
- Operating System: Ultimate Edition 3.2 32 BIT
12 posts
• Page 1 of 2 • 1, 2
Return to How To's (Do not post questions please)
Who is online
Users browsing this forum: No registered users and 14 guests